单目深度估计
作者: Victor Basu
创建日期 2021/08/30
最后修改日期 2024/08/13
描述: 使用卷积网络实现深度估计模型。

简介
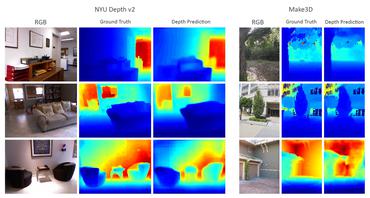
深度估计 是从 2D 图像推断场景几何的关键步骤。单目深度估计 的目标是预测每个像素的深度值,或者在仅给定单个 RGB 图像作为输入的情况下推断深度信息。本示例将展示一种使用卷积网络和简单损失函数构建深度估计模型的方法。
设置
import os

os.environ["KERAS_BACKEND"] = "tensorflow"

import sys

import tensorflow as tf
import keras
from keras import layers
from keras import ops
import pandas as pd
import numpy as np
import cv2
import matplotlib.pyplot as plt

keras.utils.set_random_seed(123)
下载数据集
本教程将使用 DIODE: A Dense Indoor and Outdoor Depth Dataset 数据集。但是,我们使用验证集来生成训练和评估子集。我们使用验证集而不是原始数据集的训练集的原因是,训练集包含 81GB 的数据,下载起来很麻烦,而验证集只有 2.6GB。您还可以使用 NYU-v2 和 KITTI 等数据集。
annotation_folder = "/dataset/"
if not os.path.exists(os.path.abspath(".") + annotation_folder):
    annotation_zip = keras.utils.get_file(
        "val.tar.gz",
        cache_subdir=os.path.abspath("."),
        origin="http://diode-dataset.s3.amazonaws.com/val.tar.gz",
        extract=True,
    )
Downloading data from http://diode-dataset.s3.amazonaws.com/val.tar.gz
2774625282/2774625282 ━━━━━━━━━━━━━━━━━━━━ 205s 0us/step
准备数据集
我们仅使用室内图像来训练我们的深度估计模型。
path = "val/indoors"

filelist = []

for root, dirs, files in os.walk(path):
    for file in files:
        filelist.append(os.path.join(root, file))

filelist.sort()
data = {
    "image": [x for x in filelist if x.endswith(".png")],
    "depth": [x for x in filelist if x.endswith("_depth.npy")],
    "mask": [x for x in filelist if x.endswith("_depth_mask.npy")],
}
df = pd.DataFrame(data)

df = df.sample(frac=1, random_state=42)
准备超参数
HEIGHT = 256
WIDTH = 256
LR = 0.00001
EPOCHS = 30
BATCH_SIZE = 32
构建数据管道
- 该管道接收一个包含 RGB 图像路径以及深度和深度掩码文件路径的数据框。
- 它读取并调整 RGB 图像的大小。
- 它读取深度和深度掩码文件,进行处理以生成深度图图像并调整其大小。
- 它为批次返回 RGB 图像和深度图图像。
class DataGenerator(keras.utils.PyDataset):
    def __init__(self, data, batch_size=6, dim=(768, 1024), n_channels=3, shuffle=True):
        super().__init__()
        """
        Initialization
        """
        self.data = data
        self.indices = self.data.index.tolist()
        self.dim = dim
        self.n_channels = n_channels
        self.batch_size = batch_size
        self.shuffle = shuffle
        self.min_depth = 0.1
        self.on_epoch_end()

    def __len__(self):
        return int(np.ceil(len(self.data) / self.batch_size))

    def __getitem__(self, index):
        if (index + 1) * self.batch_size > len(self.indices):
            self.batch_size = len(self.indices) - index * self.batch_size
        # Generate one batch of data
        # Generate indices of the batch
        index = self.indices[index * self.batch_size : (index + 1) * self.batch_size]
        # Find list of IDs
        batch = [self.indices[k] for k in index]
        x, y = self.data_generation(batch)

        return x, y

    def on_epoch_end(self):
        """
        Updates indexes after each epoch
        """
        self.index = np.arange(len(self.indices))
        if self.shuffle == True:
            np.random.shuffle(self.index)

    def load(self, image_path, depth_map, mask):
        """Load input and target image."""

        image_ = cv2.imread(image_path)
        image_ = cv2.cvtColor(image_, cv2.COLOR_BGR2RGB)
        image_ = cv2.resize(image_, self.dim)
        image_ = tf.image.convert_image_dtype(image_, tf.float32)

        depth_map = np.load(depth_map).squeeze()

        mask = np.load(mask)
        mask = mask > 0

        max_depth = min(300, np.percentile(depth_map, 99))
        depth_map = np.clip(depth_map, self.min_depth, max_depth)
        depth_map = np.log(depth_map, where=mask)

        depth_map = np.ma.masked_where(~mask, depth_map)

        depth_map = np.clip(depth_map, 0.1, np.log(max_depth))
        depth_map = cv2.resize(depth_map, self.dim)
        depth_map = np.expand_dims(depth_map, axis=2)
        depth_map = tf.image.convert_image_dtype(depth_map, tf.float32)

        return image_, depth_map

    def data_generation(self, batch):
        x = np.empty((self.batch_size, *self.dim, self.n_channels))
        y = np.empty((self.batch_size, *self.dim, 1))

        for i, batch_id in enumerate(batch):
            x[i,], y[i,] = self.load(
                self.data["image"][batch_id],
                self.data["depth"][batch_id],
                self.data["mask"][batch_id],
            )
        x, y = x.astype("float32"), y.astype("float32")
        return x, y
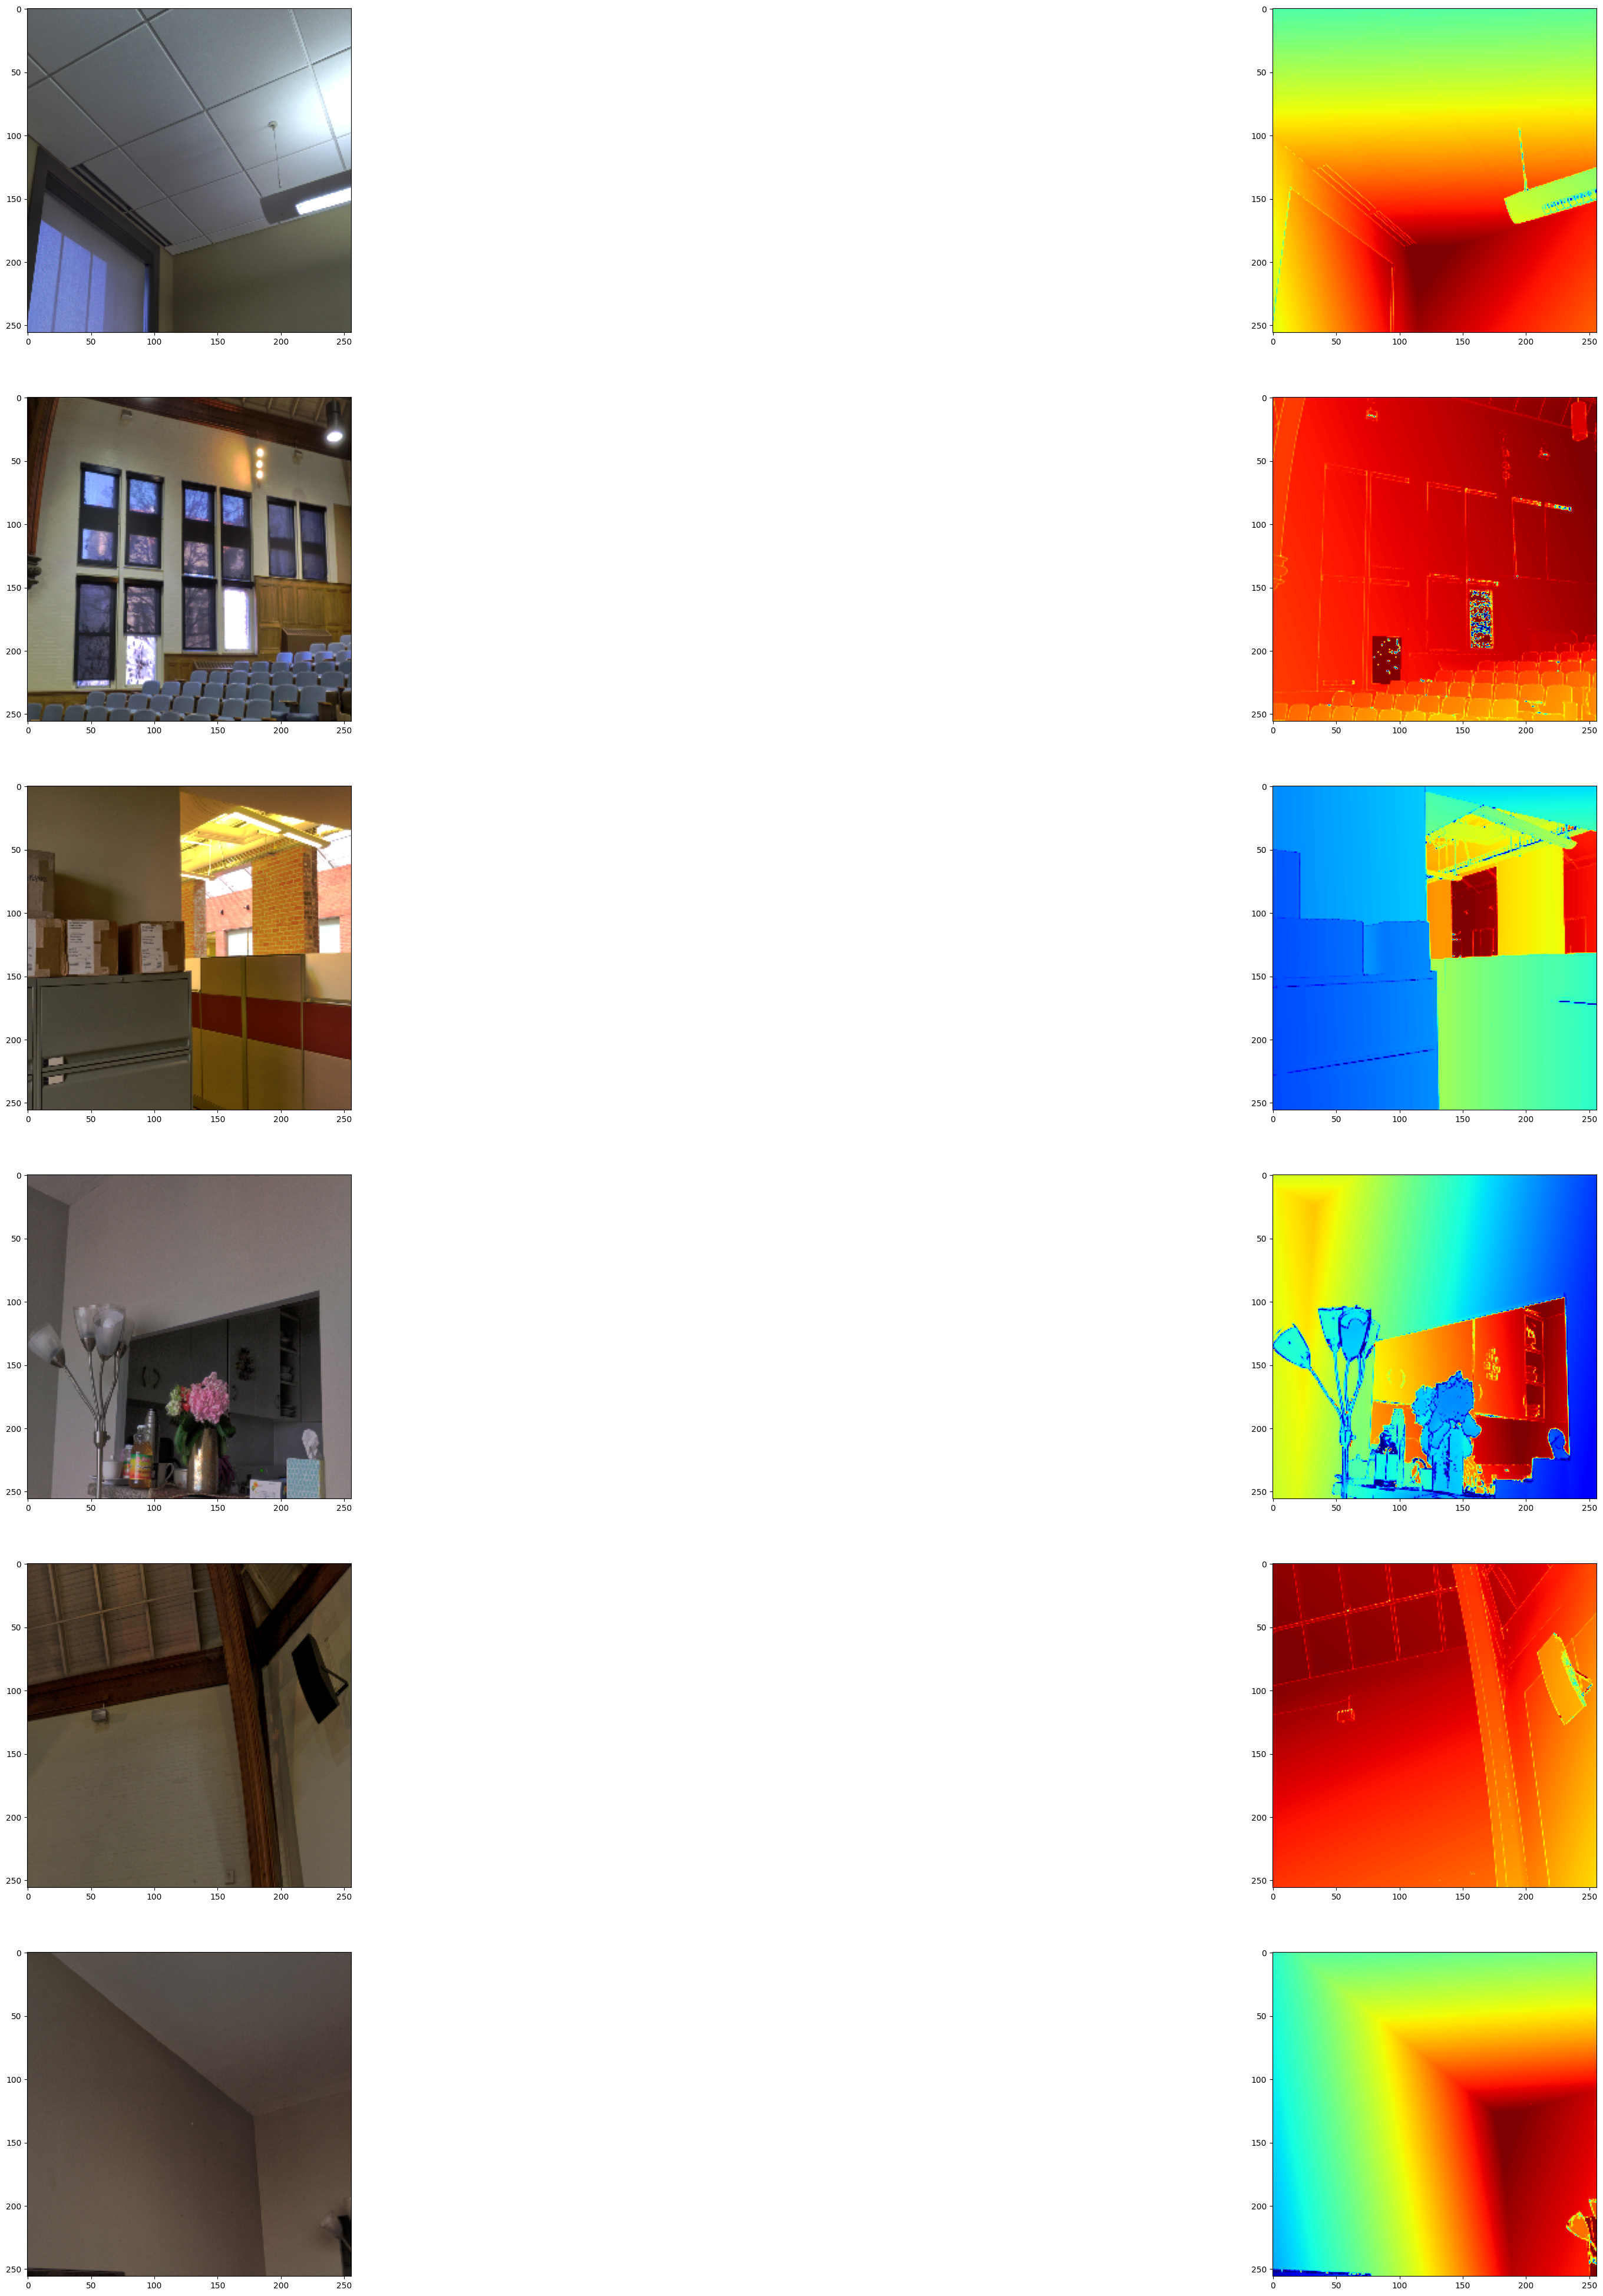
可视化样本
def visualize_depth_map(samples, test=False, model=None):
    input, target = samples
    cmap = plt.cm.jet
    cmap.set_bad(color="black")

    if test:
        pred = model.predict(input)
        fig, ax = plt.subplots(6, 3, figsize=(50, 50))
        for i in range(6):
            ax[i, 0].imshow((input[i].squeeze()))
            ax[i, 1].imshow((target[i].squeeze()), cmap=cmap)
            ax[i, 2].imshow((pred[i].squeeze()), cmap=cmap)

    else:
        fig, ax = plt.subplots(6, 2, figsize=(50, 50))
        for i in range(6):
            ax[i, 0].imshow((input[i].squeeze()))
            ax[i, 1].imshow((target[i].squeeze()), cmap=cmap)


visualize_samples = next(
    iter(DataGenerator(data=df, batch_size=6, dim=(HEIGHT, WIDTH)))
)
visualize_depth_map(visualize_samples)
3D 点云可视化
depth_vis = np.flipud(visualize_samples[1][1].squeeze())  # target
img_vis = np.flipud(visualize_samples[0][1].squeeze())  # input

fig = plt.figure(figsize=(15, 10))
ax = plt.axes(projection="3d")

STEP = 3
for x in range(0, img_vis.shape[0], STEP):
    for y in range(0, img_vis.shape[1], STEP):
        ax.scatter(
            [depth_vis[x, y]] * 3,
            [y] * 3,
            [x] * 3,
            c=tuple(img_vis[x, y, :3] / 255),
            s=3,
        )
    ax.view_init(45, 135)

构建模型
- 基本模型来自 U-Net。
- 在下采样块中实现了加性跳跃连接。
class DownscaleBlock(layers.Layer):
    def __init__(
        self, filters, kernel_size=(3, 3), padding="same", strides=1, **kwargs
    ):
        super().__init__(**kwargs)
        self.convA = layers.Conv2D(filters, kernel_size, strides, padding)
        self.convB = layers.Conv2D(filters, kernel_size, strides, padding)
        self.reluA = layers.LeakyReLU(negative_slope=0.2)
        self.reluB = layers.LeakyReLU(negative_slope=0.2)
        self.bn2a = layers.BatchNormalization()
        self.bn2b = layers.BatchNormalization()

        self.pool = layers.MaxPool2D((2, 2), (2, 2))

    def call(self, input_tensor):
        d = self.convA(input_tensor)
        x = self.bn2a(d)
        x = self.reluA(x)

        x = self.convB(x)
        x = self.bn2b(x)
        x = self.reluB(x)

        x += d
        p = self.pool(x)
        return x, p


class UpscaleBlock(layers.Layer):
    def __init__(
        self, filters, kernel_size=(3, 3), padding="same", strides=1, **kwargs
    ):
        super().__init__(**kwargs)
        self.us = layers.UpSampling2D((2, 2))
        self.convA = layers.Conv2D(filters, kernel_size, strides, padding)
        self.convB = layers.Conv2D(filters, kernel_size, strides, padding)
        self.reluA = layers.LeakyReLU(negative_slope=0.2)
        self.reluB = layers.LeakyReLU(negative_slope=0.2)
        self.bn2a = layers.BatchNormalization()
        self.bn2b = layers.BatchNormalization()
        self.conc = layers.Concatenate()

    def call(self, x, skip):
        x = self.us(x)
        concat = self.conc([x, skip])
        x = self.convA(concat)
        x = self.bn2a(x)
        x = self.reluA(x)

        x = self.convB(x)
        x = self.bn2b(x)
        x = self.reluB(x)

        return x


class BottleNeckBlock(layers.Layer):
    def __init__(
        self, filters, kernel_size=(3, 3), padding="same", strides=1, **kwargs
    ):
        super().__init__(**kwargs)
        self.convA = layers.Conv2D(filters, kernel_size, strides, padding)
        self.convB = layers.Conv2D(filters, kernel_size, strides, padding)
        self.reluA = layers.LeakyReLU(negative_slope=0.2)
        self.reluB = layers.LeakyReLU(negative_slope=0.2)

    def call(self, x):
        x = self.convA(x)
        x = self.reluA(x)
        x = self.convB(x)
        x = self.reluB(x)
        return x
定义损失
我们将优化模型中的 3 种损失。1. 结构相似性指数 (SSIM)。2. L1 损失,或在本例中为逐点深度。3. 深度平滑损失。
在三种损失函数中,SSIM 对提高模型性能的贡献最大。
def image_gradients(image):
    if len(ops.shape(image)) != 4:
        raise ValueError(
            "image_gradients expects a 4D tensor "
            "[batch_size, h, w, d], not {}.".format(ops.shape(image))
        )

    image_shape = ops.shape(image)
    batch_size, height, width, depth = ops.unstack(image_shape)

    dy = image[:, 1:, :, :] - image[:, :-1, :, :]
    dx = image[:, :, 1:, :] - image[:, :, :-1, :]

    # Return tensors with same size as original image by concatenating
    # zeros. Place the gradient [I(x+1,y) - I(x,y)] on the base pixel (x, y).
    shape = ops.stack([batch_size, 1, width, depth])
    dy = ops.concatenate([dy, ops.zeros(shape, dtype=image.dtype)], axis=1)
    dy = ops.reshape(dy, image_shape)

    shape = ops.stack([batch_size, height, 1, depth])
    dx = ops.concatenate([dx, ops.zeros(shape, dtype=image.dtype)], axis=2)
    dx = ops.reshape(dx, image_shape)

    return dy, dx


class DepthEstimationModel(keras.Model):
    def __init__(self):
        super().__init__()
        self.ssim_loss_weight = 0.85
        self.l1_loss_weight = 0.1
        self.edge_loss_weight = 0.9
        self.loss_metric = keras.metrics.Mean(name="loss")
        f = [16, 32, 64, 128, 256]
        self.downscale_blocks = [
            DownscaleBlock(f[0]),
            DownscaleBlock(f[1]),
            DownscaleBlock(f[2]),
            DownscaleBlock(f[3]),
        ]
        self.bottle_neck_block = BottleNeckBlock(f[4])
        self.upscale_blocks = [
            UpscaleBlock(f[3]),
            UpscaleBlock(f[2]),
            UpscaleBlock(f[1]),
            UpscaleBlock(f[0]),
        ]
        self.conv_layer = layers.Conv2D(1, (1, 1), padding="same", activation="tanh")

    def calculate_loss(self, target, pred):
        # Edges
        dy_true, dx_true = image_gradients(target)
        dy_pred, dx_pred = image_gradients(pred)
        weights_x = ops.cast(ops.exp(ops.mean(ops.abs(dx_true))), "float32")
        weights_y = ops.cast(ops.exp(ops.mean(ops.abs(dy_true))), "float32")

        # Depth smoothness
        smoothness_x = dx_pred * weights_x
        smoothness_y = dy_pred * weights_y

        depth_smoothness_loss = ops.mean(abs(smoothness_x)) + ops.mean(
            abs(smoothness_y)
        )

        # Structural similarity (SSIM) index
        ssim_loss = ops.mean(
            1
            - tf.image.ssim(
                target, pred, max_val=WIDTH, filter_size=7, k1=0.01**2, k2=0.03**2
            )
        )
        # Point-wise depth
        l1_loss = ops.mean(ops.abs(target - pred))

        loss = (
            (self.ssim_loss_weight * ssim_loss)
            + (self.l1_loss_weight * l1_loss)
            + (self.edge_loss_weight * depth_smoothness_loss)
        )

        return loss

    @property
    def metrics(self):
        return [self.loss_metric]

    def train_step(self, batch_data):
        input, target = batch_data
        with tf.GradientTape() as tape:
            pred = self(input, training=True)
            loss = self.calculate_loss(target, pred)

        gradients = tape.gradient(loss, self.trainable_variables)
        self.optimizer.apply_gradients(zip(gradients, self.trainable_variables))
        self.loss_metric.update_state(loss)
        return {
            "loss": self.loss_metric.result(),
        }

    def test_step(self, batch_data):
        input, target = batch_data

        pred = self(input, training=False)
        loss = self.calculate_loss(target, pred)

        self.loss_metric.update_state(loss)
        return {
            "loss": self.loss_metric.result(),
        }

    def call(self, x):
        c1, p1 = self.downscale_blocks[0](x)
        c2, p2 = self.downscale_blocks[1](p1)
        c3, p3 = self.downscale_blocks[2](p2)
        c4, p4 = self.downscale_blocks[3](p3)

        bn = self.bottle_neck_block(p4)

        u1 = self.upscale_blocks[0](bn, c4)
        u2 = self.upscale_blocks[1](u1, c3)
        u3 = self.upscale_blocks[2](u2, c2)
        u4 = self.upscale_blocks[3](u3, c1)

        return self.conv_layer(u4)
模型训练
optimizer = keras.optimizers.SGD(
    learning_rate=LR,
    nesterov=False,
)
model = DepthEstimationModel()
# Compile the model
model.compile(optimizer)

train_loader = DataGenerator(
    data=df[:260].reset_index(drop="true"), batch_size=BATCH_SIZE, dim=(HEIGHT, WIDTH)
)
validation_loader = DataGenerator(
    data=df[260:].reset_index(drop="true"), batch_size=BATCH_SIZE, dim=(HEIGHT, WIDTH)
)
model.fit(
    train_loader,
    epochs=EPOCHS,
    validation_data=validation_loader,
)
Epoch 1/30
 9/9 ━━━━━━━━━━━━━━━━━━━━ 64s 5s/step - loss: 0.7656 - val_loss: 0.7738
Epoch 10/30
 9/9 ━━━━━━━━━━━━━━━━━━━━ 7s 602ms/step - loss: 0.7005 - val_loss: 0.6696
Epoch 20/30
 9/9 ━━━━━━━━━━━━━━━━━━━━ 7s 632ms/step - loss: 0.5827 - val_loss: 0.5821
Epoch 30/30
 9/9 ━━━━━━━━━━━━━━━━━━━━ 7s 593ms/step - loss: 0.6218 - val_loss: 0.5132
<keras.src.callbacks.history.History at 0x7f5a2886d210>
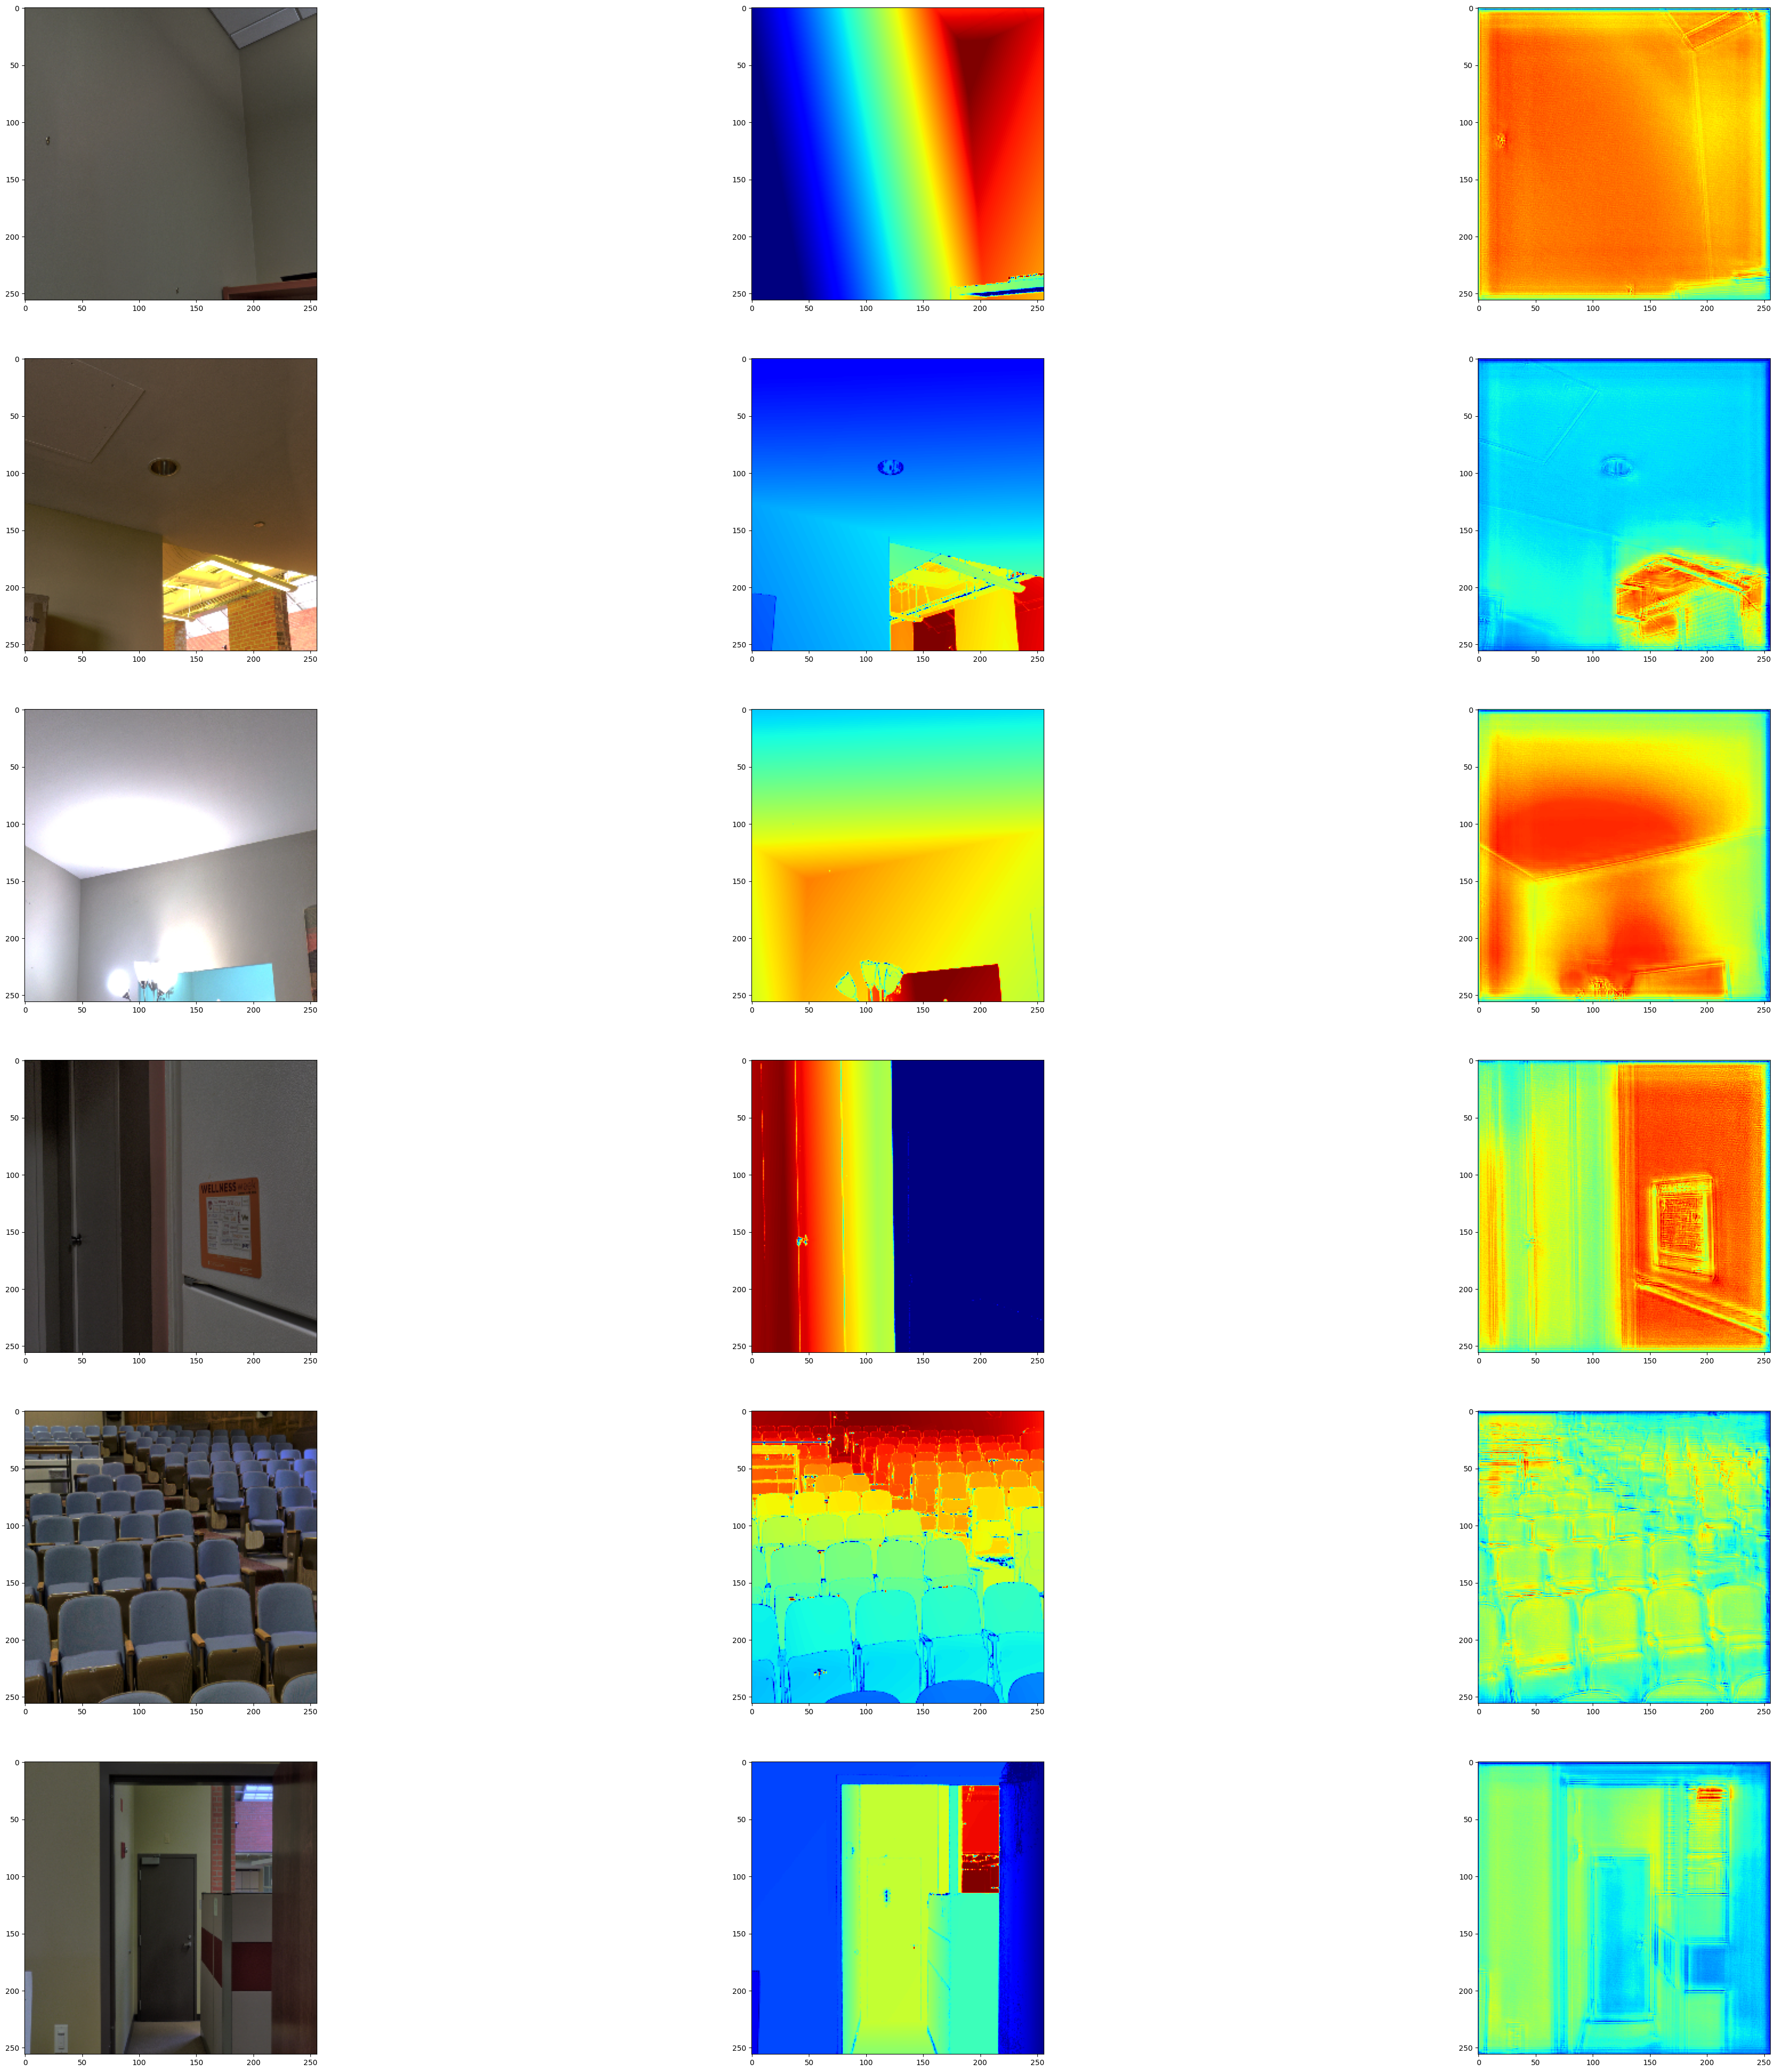
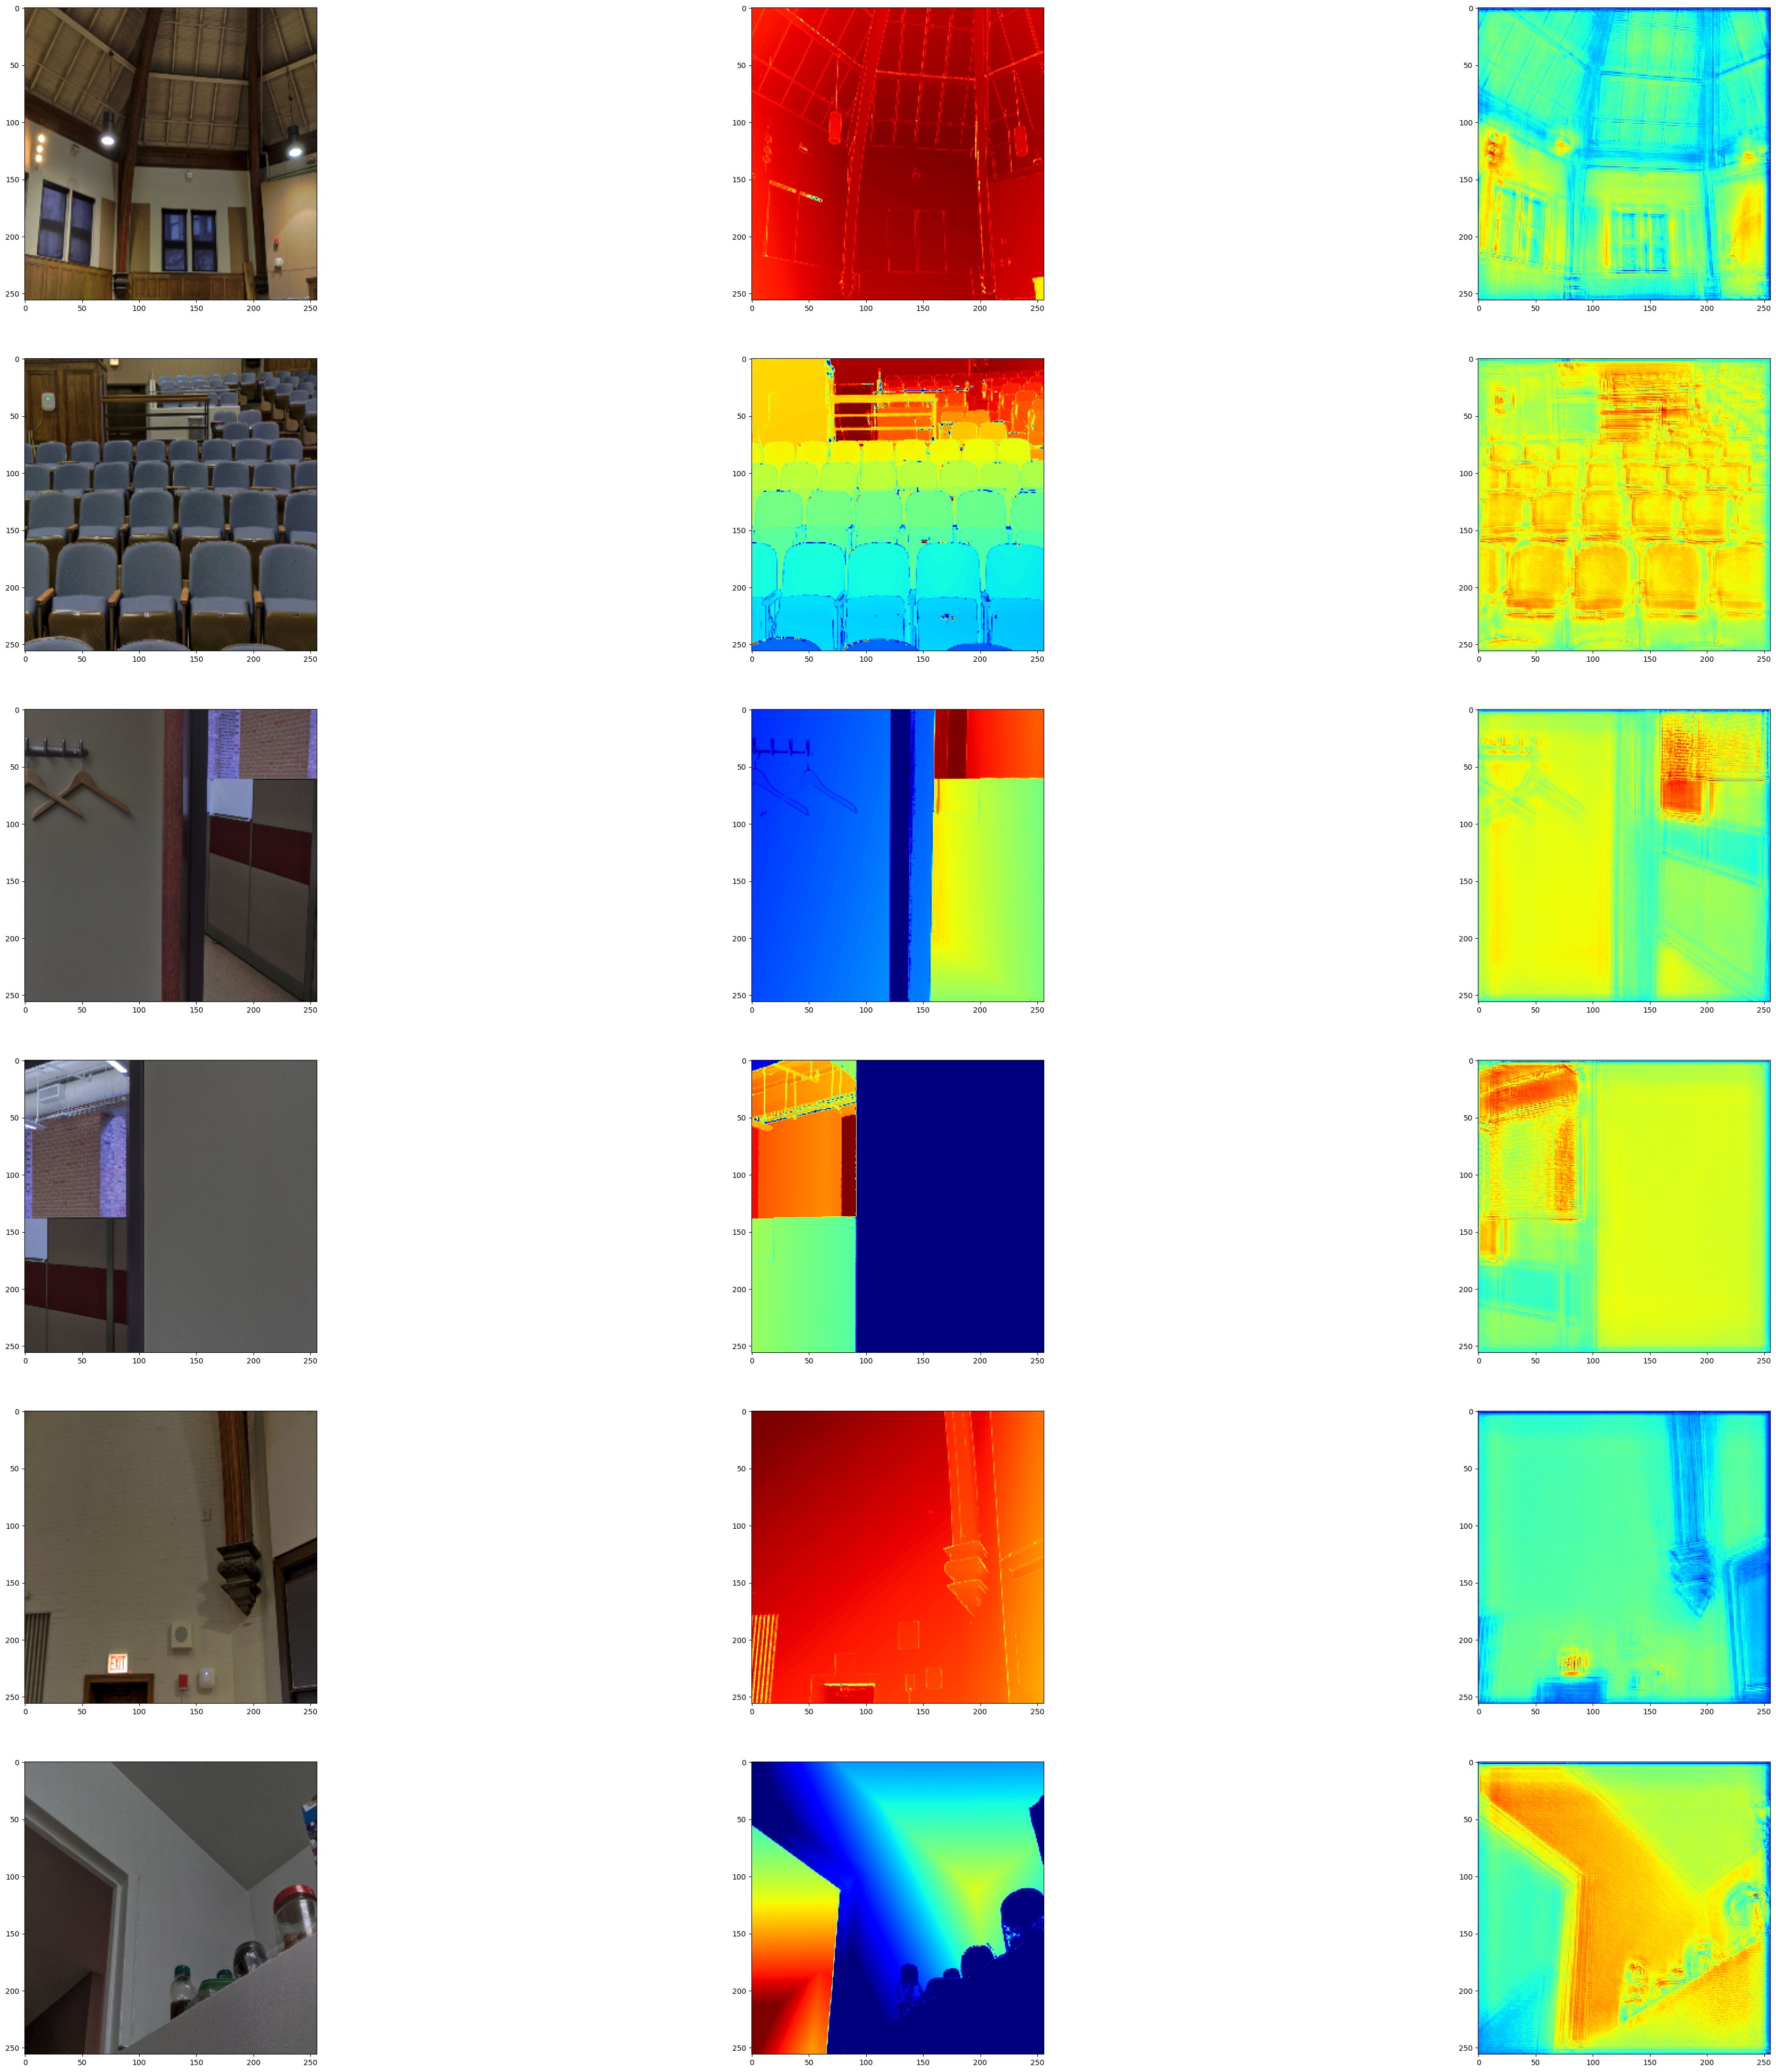
可视化模型输出
我们在验证集上可视化模型的输出。第一张图像是 RGB 图像,第二张图像是真实深度图图像,第三张是预测的深度图图像。
test_loader = next(
    iter(
        DataGenerator(
            data=df[265:].reset_index(drop="true"), batch_size=6, dim=(HEIGHT, WIDTH)
        )
    )
)
visualize_depth_map(test_loader, test=True, model=model)

test_loader = next(
    iter(
        DataGenerator(
            data=df[300:].reset_index(drop="true"), batch_size=6, dim=(HEIGHT, WIDTH)
        )
    )
)
visualize_depth_map(test_loader, test=True, model=model)
1/1 ━━━━━━━━━━━━━━━━━━━━ 0s 781ms/step
1/1 ━━━━━━━━━━━━━━━━━━━━ 1s 782ms/step
1/1 ━━━━━━━━━━━━━━━━━━━━ 0s 171ms/step
1/1 ━━━━━━━━━━━━━━━━━━━━ 0s 172ms/step
可能的改进
- 您可以通过将 U-Net 的编码部分替换为预训练的 DenseNet 或 ResNet 来改进此模型。
- 损失函数在解决此问题中起着重要作用。调整损失函数可能会带来显著的改进。
参考文献
以下论文深入探讨了深度估计的可能方法。1. Depth Prediction Without the Sensors: Leveraging Structure for Unsupervised Learning from Monocular Videos 2. Digging Into Self-Supervised Monocular Depth Estimation 3. Deeper Depth Prediction with Fully Convolutional Residual Networks
您也可以在 papers with code 深度估计任务中找到有用的实现。
您可以使用托管在 Hugging Face Hub 上的训练模型,并在 Hugging Face Spaces 上尝试演示。