KerasHub 中的分割一切
作者: Tirth Patel, Ian Stenbit, Divyashree Sreepathihalli
创建日期 2024/10/1
最后修改日期 2024/10/1
描述: 使用 KerasHub 中的文本、框和点提示分割一切。

概述
分割一切模型 (SAM) 从点或框等输入提示生成高质量的对象掩码,并且可用于生成图像中所有对象的掩码。它已在包含 1100 万张图像和 11 亿个掩码的数据集上进行了训练,并在各种分割任务上具有强大的零样本性能。
在本指南中,我们将展示如何使用 KerasHub 的分割一切模型实现,并展示 TensorFlow 和 JAX 的性能提升有多强大。
首先,让我们获取演示所需的所有依赖项和图像。
!!pip install -Uq git+https://github.com/keras-team/keras-hub.git
!!pip install -Uq keras
!!wget -q https://raw.githubusercontent.com/facebookresearch/segment-anything/main/notebooks/images/truck.jpg
选择您的后端
使用 Keras 3,您可以选择使用您喜欢的后端!
import os

os.environ["KERAS_BACKEND"] = "jax"

import timeit
import numpy as np
import matplotlib.pyplot as plt
import keras
from keras import ops
import keras_hub
辅助函数
让我们定义一些用于可视化图像、提示和分割结果的辅助函数。
def show_mask(mask, ax, random_color=False):
    if random_color:
        color = np.concatenate([np.random.random(3), np.array([0.6])], axis=0)
    else:
        color = np.array([30 / 255, 144 / 255, 255 / 255, 0.6])
    h, w = mask.shape[-2:]
    mask_image = mask.reshape(h, w, 1) * color.reshape(1, 1, -1)
    ax.imshow(mask_image)


def show_points(coords, labels, ax, marker_size=375):
    pos_points = coords[labels == 1]
    neg_points = coords[labels == 0]
    ax.scatter(
        pos_points[:, 0],
        pos_points[:, 1],
        color="green",
        marker="*",
        s=marker_size,
        edgecolor="white",
        linewidth=1.25,
    )
    ax.scatter(
        neg_points[:, 0],
        neg_points[:, 1],
        color="red",
        marker="*",
        s=marker_size,
        edgecolor="white",
        linewidth=1.25,
    )


def show_box(box, ax):
    box = box.reshape(-1)
    x0, y0 = box[0], box[1]
    w, h = box[2] - box[0], box[3] - box[1]
    ax.add_patch(
        plt.Rectangle((x0, y0), w, h, edgecolor="green", facecolor=(0, 0, 0, 0), lw=2)
    )


def inference_resizing(image, pad=True):
    # Compute Preprocess Shape
    image = ops.cast(image, dtype="float32")
    old_h, old_w = image.shape[0], image.shape[1]
    scale = 1024 * 1.0 / max(old_h, old_w)
    new_h = old_h * scale
    new_w = old_w * scale
    preprocess_shape = int(new_h + 0.5), int(new_w + 0.5)

    # Resize the image
    image = ops.image.resize(image[None, ...], preprocess_shape)[0]

    # Pad the shorter side
    if pad:
        pixel_mean = ops.array([123.675, 116.28, 103.53])
        pixel_std = ops.array([58.395, 57.12, 57.375])
        image = (image - pixel_mean) / pixel_std
        h, w = image.shape[0], image.shape[1]
        pad_h = 1024 - h
        pad_w = 1024 - w
        image = ops.pad(image, [(0, pad_h), (0, pad_w), (0, 0)])
        # KerasHub now rescales the images and normalizes them.
        # Just unnormalize such that when KerasHub normalizes them
        # again, the padded values map to 0.
        image = image * pixel_std + pixel_mean
    return image
获取预训练的 SAM 模型
我们可以使用 KerasHub 的 from_preset 工厂方法初始化一个训练好的 SAM 模型。在这里,我们使用在 SA-1B 数据集上训练的巨大的 ViT 主干 (sam_huge_sa1b) 来获得高质量的分割掩码。您也可以使用 sam_large_sa1b 或 sam_base_sa1b 中的一个来获得更好的性能(但分割掩码质量会降低)。
model = keras_hub.models.SAMImageSegmenter.from_preset("sam_huge_sa1b")
理解提示
分割一切允许使用点、框和掩码对图像进行提示
- 点提示是最基本的:模型会尝试根据图像上的点来猜测对象。该点可以是前景点(即所需的分割掩码包含该点)或背景点(即该点位于所需掩码之外)。
- 另一种提示模型的方式是使用框。给定一个边界框,模型会尝试分割其中包含的对象。
- 最后,模型也可以使用掩码本身进行提示。这对于例如完善先前预测或已知分割掩码的边界很有用。
使模型如此强大的原因是它能够组合上述提示。点、框和掩码提示可以以多种不同的方式组合,以获得最佳结果。
让我们看看将这些提示传递给 KerasHub 中的分割一切模型所涉及的语义。SAM 模型的输入是一个字典,其中包含以下键:
"images":要分割的图像批次。形状必须为(B, 1024, 1024, 3)。"points":点提示批次。每个点都是一个(x, y)坐标,原点位于图像的左上角。换句话说,每个点都是(r, c)的形式,其中r和c是图像中像素的行和列。形状必须为(B, N, 2)。"labels":给定点的标签批次。1代表前景点,0代表背景点。形状必须为(B, N)。"boxes":框批次。请注意,模型每个批次只接受一个框。因此,预期的形状为(B, 1, 2, 2)。每个框是 2 个点的集合:框的左上角和右下角。这里的点遵循与点提示相同的语义。这里的第二个维度中的1表示框提示的存在。如果缺少框提示,则必须传递形状为(B, 0, 2, 2)的占位符输入。"masks":掩码批次。与框提示一样,每个图像只允许一个掩码提示。如果存在,输入掩码的形状必须为(B, 1, 256, 256, 1),如果缺少掩码提示,则为(B, 0, 256, 256, 1)。
仅当直接调用模型(即 model(...))时才需要占位符提示。调用 predict 方法时,可以从输入字典中省略缺失的提示。
点提示
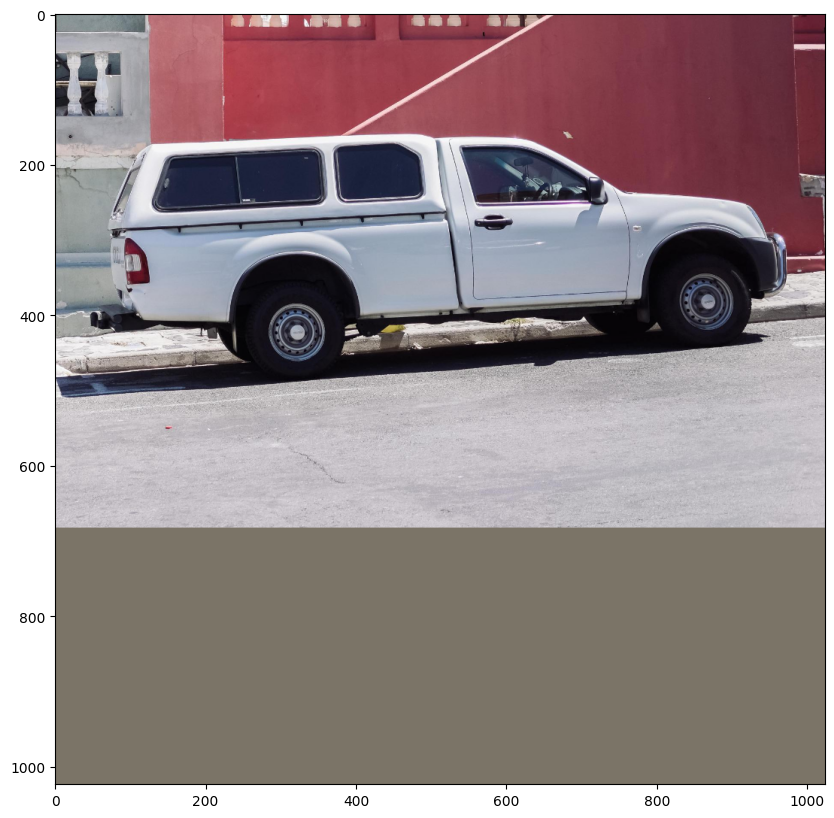
首先,让我们使用点提示分割图像。我们加载图像并将其调整为 (1024, 1024) 的形状,这是预训练的 SAM 模型所需的图像大小。
# Load our image
image = np.array(keras.utils.load_img("truck.jpg"))
image = inference_resizing(image)

plt.figure(figsize=(10, 10))
plt.imshow(ops.convert_to_numpy(image) / 255.0)
plt.axis("on")
plt.show()
接下来,我们将定义要分割的对象上的点。让我们尝试分割坐标为 (284, 213) 的卡车的窗户玻璃。
# Define the input point prompt
input_point = np.array([[284, 213.5]])
input_label = np.array([1])

plt.figure(figsize=(10, 10))
plt.imshow(ops.convert_to_numpy(image) / 255.0)
show_points(input_point, input_label, plt.gca())
plt.axis("on")
plt.show()

现在让我们调用我们模型的 predict 方法来获取分割掩码。
注意:我们不直接调用模型(model(...)),因为直接调用需要占位符提示。predict 方法会自动处理缺失的提示,所以我们调用它。此外,当没有框提示时,点和标签需要分别用零点提示和 -1 标签提示进行填充。下面的单元格演示了这一点。
outputs = model.predict(
    {
        "images": image[np.newaxis, ...],
        "points": np.concatenate(
            [input_point[np.newaxis, ...], np.zeros((1, 1, 2))], axis=1
        ),
        "labels": np.concatenate(
            [input_label[np.newaxis, ...], np.full((1, 1), fill_value=-1)], axis=1
        ),
    }
)
SegmentAnythingModel.predict 返回两个输出。第一个是 logits(分割掩码),形状为 (1, 4, 256, 256),另一个是每个预测掩码的 IoU 置信分数(形状为 (1, 4))。预训练的 SAM 模型预测四个掩码:第一个是模型为给定提示能想到的最佳掩码,其他 3 个是备用掩码,可以在最佳预测不包含所需对象时使用。用户可以选择他们喜欢的任何掩码。
让我们可视化模型返回的掩码!
# Resize the mask to our image shape i.e. (1024, 1024)
mask = inference_resizing(outputs["masks"][0][0][..., None], pad=False)[..., 0]
# Convert the logits to a numpy array
# and convert the logits to a boolean mask
mask = ops.convert_to_numpy(mask) > 0.0
iou_score = ops.convert_to_numpy(outputs["iou_pred"][0][0])

plt.figure(figsize=(10, 10))
plt.imshow(ops.convert_to_numpy(image) / 255.0)
show_mask(mask, plt.gca())
show_points(input_point, input_label, plt.gca())
plt.title(f"IoU Score: {iou_score:.3f}", fontsize=18)
plt.axis("off")
plt.show()
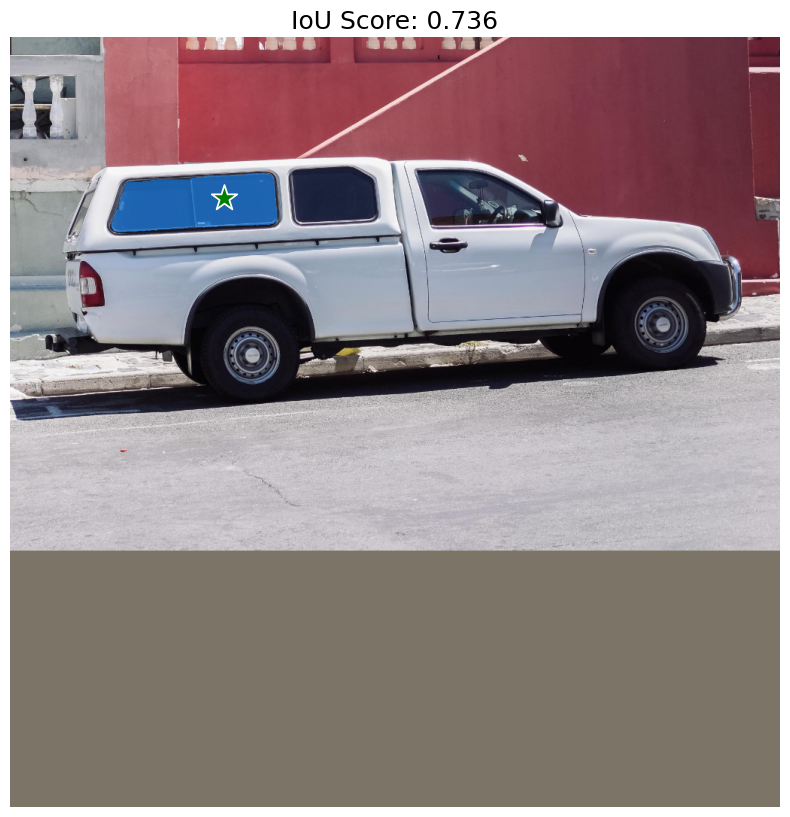
正如预期的那样,模型为卡车的窗户玻璃返回了一个分割掩码。但是,我们的点提示也可以指代其他一些事物。例如,包含我们点的另一个可能的掩码只是窗户玻璃的右侧或整个卡车。
让我们也可视化模型预测的其他掩码。
fig, ax = plt.subplots(1, 3, figsize=(20, 60))
masks, scores = outputs["masks"][0][1:], outputs["iou_pred"][0][1:]
for i, (mask, score) in enumerate(zip(masks, scores)):
    mask = inference_resizing(mask[..., None], pad=False)[..., 0]
    mask, score = map(ops.convert_to_numpy, (mask, score))
    mask = 1 * (mask > 0.0)
    ax[i].imshow(ops.convert_to_numpy(image) / 255.0)
    show_mask(mask, ax[i])
    show_points(input_point, input_label, ax[i])
    ax[i].set_title(f"Mask {i+1}, Score: {score:.3f}", fontsize=12)
    ax[i].axis("off")
plt.show()
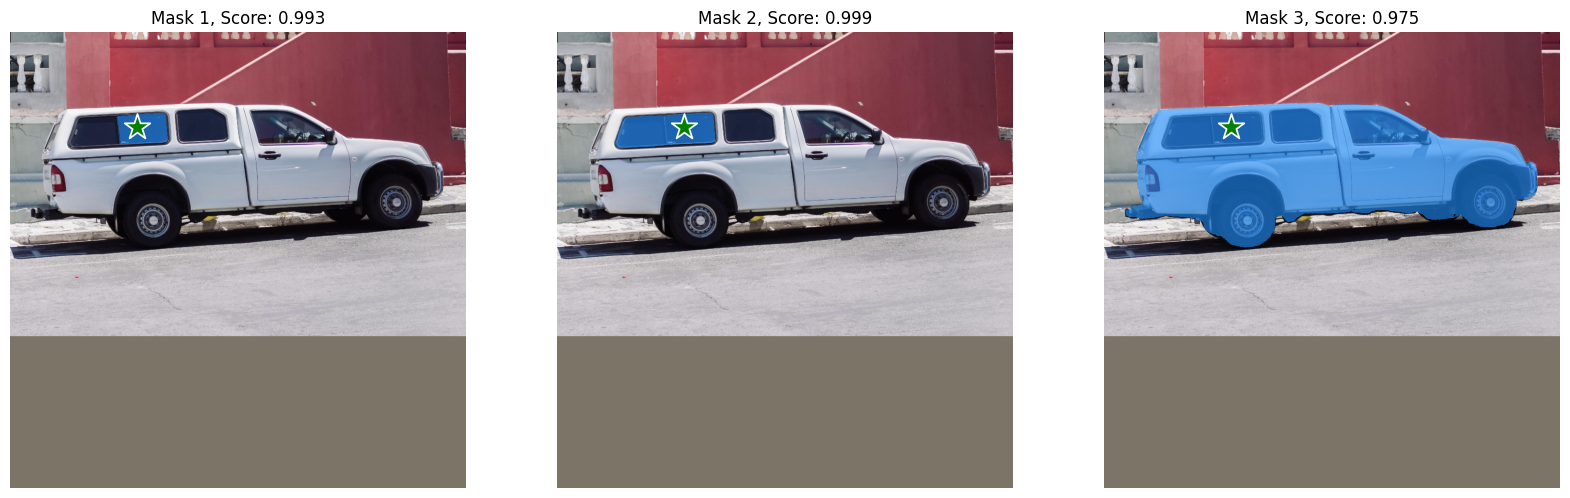
太棒了!SAM 能够捕捉到我们点提示的歧义,并且还返回了其他可能的分割掩码。
框提示
现在,让我们看看如何使用框提示模型。框使用两个点指定,即边界框的左上角和右下角,格式为 xyxy。让我们使用围绕卡车左前轮胎的边界框来提示模型。
# Let's specify the box
input_box = np.array([[240, 340], [400, 500]])

outputs = model.predict(
    {"images": image[np.newaxis, ...], "boxes": input_box[np.newaxis, np.newaxis, ...]}
)
mask = inference_resizing(outputs["masks"][0][0][..., None], pad=False)[..., 0]
mask = ops.convert_to_numpy(mask) > 0.0

plt.figure(figsize=(10, 10))
plt.imshow(ops.convert_to_numpy(image) / 255.0)
show_mask(mask, plt.gca())
show_box(input_box, plt.gca())
plt.axis("off")
plt.show()
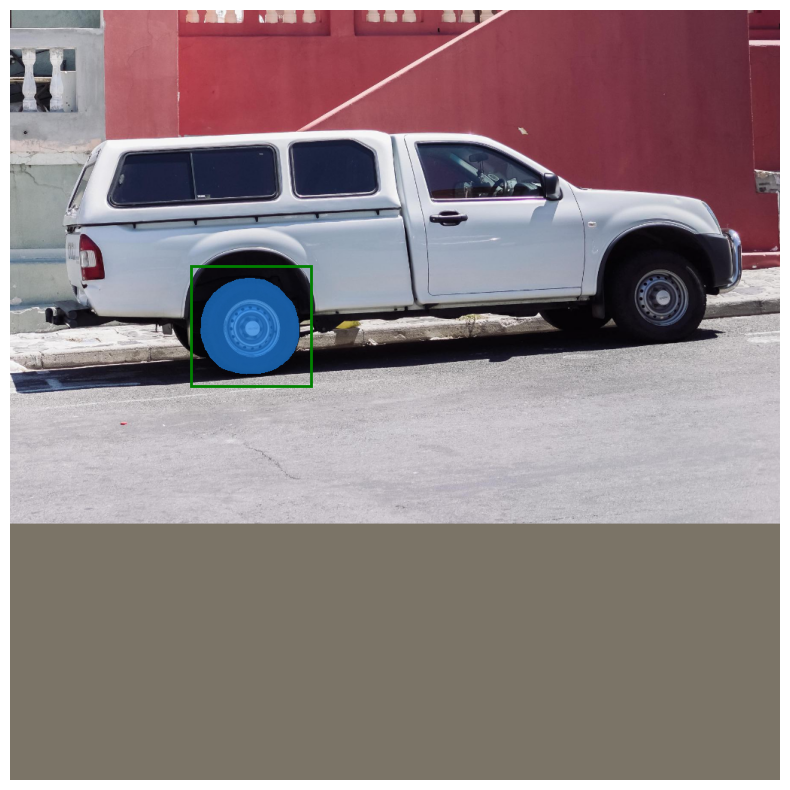
搞定!模型完美地分割出了我们边界框中的左前轮胎。
组合提示
为了充分发挥模型的潜力,让我们组合框和点提示,看看模型会做什么。
# Let's specify the box
input_box = np.array([[240, 340], [400, 500]])
# Let's specify the point and mark it background
input_point = np.array([[325, 425]])
input_label = np.array([0])

outputs = model.predict(
    {
        "images": image[np.newaxis, ...],
        "points": input_point[np.newaxis, ...],
        "labels": input_label[np.newaxis, ...],
        "boxes": input_box[np.newaxis, np.newaxis, ...],
    }
)
mask = inference_resizing(outputs["masks"][0][0][..., None], pad=False)[..., 0]
mask = ops.convert_to_numpy(mask) > 0.0

plt.figure(figsize=(10, 10))
plt.imshow(ops.convert_to_numpy(image) / 255.0)
show_mask(mask, plt.gca())
show_box(input_box, plt.gca())
show_points(input_point, input_label, plt.gca())
plt.axis("off")
plt.show()
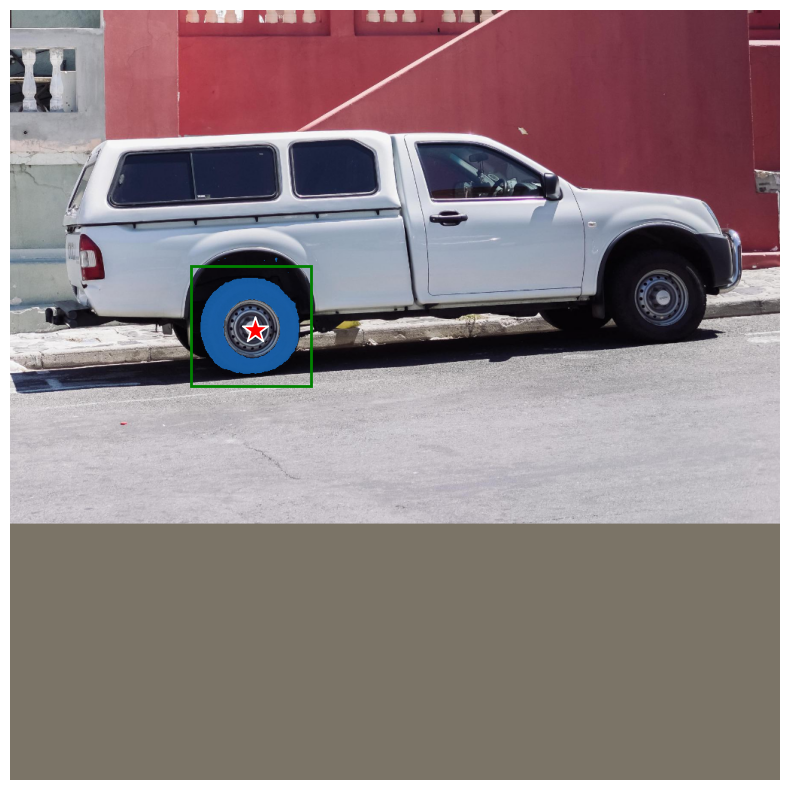
瞧!模型理解了我们想从掩码中排除的对象是轮胎的轮毂。
文本提示
最后,让我们看看如何将文本提示与 KerasHub 的 SegmentAnythingModel 一起使用。
对于这个演示,我们将使用官方 Grounding DINO 模型。Grounding DINO 是一个模型,它以 (image, text) 对作为输入,并在 image 中围绕 text 描述的对象生成边界框。您可以在论文中找到有关模型实现的更多详细信息。
对于此演示部分,我们需要从源代码安装 groundingdino 包
pip install -U git+https://github.com/IDEA-Research/GroundingDINO.git
然后,我们可以安装预训练模型的权重和配置
!!pip install -U git+https://github.com/IDEA-Research/GroundingDINO.git
!!wget -q https://github.com/IDEA-Research/GroundingDINO/releases/download/v0.1.0-alpha/groundingdino_swint_ogc.pth
!!wget -q https://raw.githubusercontent.com/IDEA-Research/GroundingDINO/v0.1.0-alpha2/groundingdino/config/GroundingDINO_SwinT_OGC.py
from groundingdino.util.inference import Model as GroundingDINO

CONFIG_PATH = "GroundingDINO_SwinT_OGC.py"
WEIGHTS_PATH = "groundingdino_swint_ogc.pth"

grounding_dino = GroundingDINO(CONFIG_PATH, WEIGHTS_PATH)
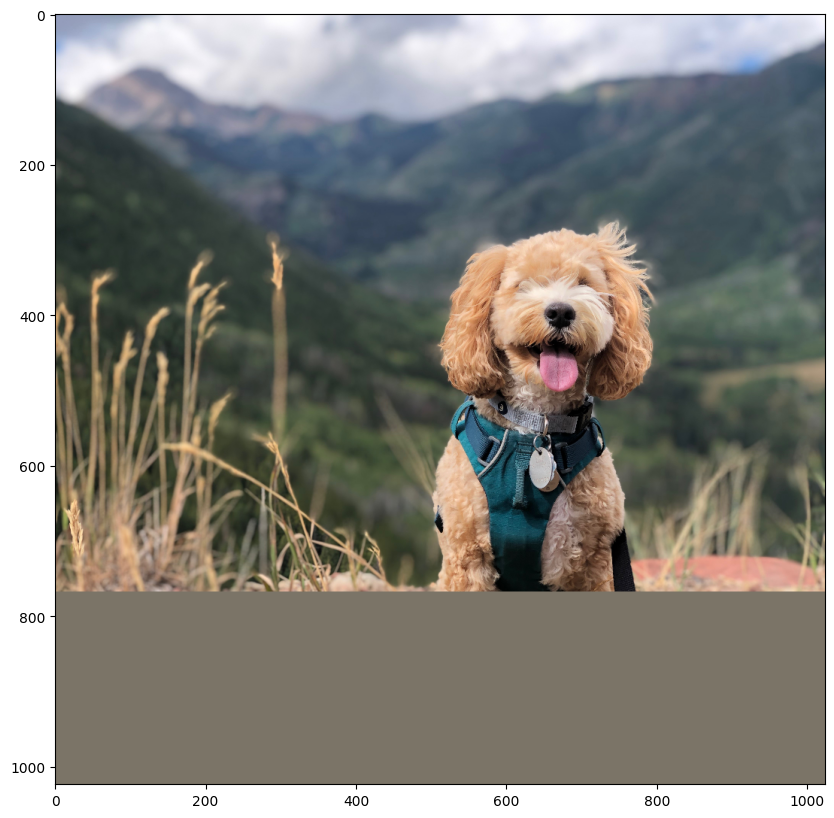
让我们为此部分加载一张狗的图片!
filepath = keras.utils.get_file(
    origin="https://storage.googleapis.com/keras-cv/test-images/mountain-dog.jpeg"
)
image = np.array(keras.utils.load_img(filepath))
image = ops.convert_to_numpy(inference_resizing(image))

plt.figure(figsize=(10, 10))
plt.imshow(image / 255.0)
plt.axis("on")
plt.show()
我们首先使用 Grounding DINO 模型预测我们要分割的对象的边界框。然后,我们使用边界框提示 SAM 模型来获取分割掩码。
让我们尝试分割出狗的挽具。更改下面的图像和文本,以使用图像中的文本分割您想要的任何内容!
# Let's predict the bounding box for the harness of the dog
boxes = grounding_dino.predict_with_caption(image.astype(np.uint8), "harness")
boxes = np.array(boxes[0].xyxy)

outputs = model.predict(
    {
        "images": np.repeat(image[np.newaxis, ...], boxes.shape[0], axis=0),
        "boxes": boxes.reshape(-1, 1, 2, 2),
    },
    batch_size=1,
)
就这样!我们通过组合 Grounding DINO + SAM 获得了文本提示的分割掩码!这是一个非常强大的技术,可以组合不同的模型以扩展应用程序!
让我们可视化结果。
plt.figure(figsize=(10, 10))
plt.imshow(image / 255.0)

for mask in outputs["masks"]:
    mask = inference_resizing(mask[0][..., None], pad=False)[..., 0]
    mask = ops.convert_to_numpy(mask) > 0.0
    show_mask(mask, plt.gca())
    show_box(boxes, plt.gca())

plt.axis("off")
plt.show()

优化 SAM
您可以使用 mixed_float16 或 bfloat16 数据类型策略来获得巨大的速度提升和内存优化,而精度损失相对较小。
# Load our image
image = np.array(keras.utils.load_img("truck.jpg"))
image = inference_resizing(image)

# Specify the prompt
input_box = np.array([[240, 340], [400, 500]])

# Let's first see how fast the model is with float32 dtype
time_taken = timeit.repeat(
    'model.predict({"images": image[np.newaxis, ...], "boxes": input_box[np.newaxis, np.newaxis, ...]}, verbose=False)',
    repeat=3,
    number=3,
    globals=globals(),
)
print(f"Time taken with float32 dtype: {min(time_taken) / 3:.10f}s")

# Set the dtype policy in Keras
keras.mixed_precision.set_global_policy("mixed_float16")

model = keras_hub.models.SAMImageSegmenter.from_preset("sam_huge_sa1b")

time_taken = timeit.repeat(
    'model.predict({"images": image[np.newaxis, ...], "boxes": input_box[np.newaxis,np.newaxis, ...]}, verbose=False)',
    repeat=3,
    number=3,
    globals=globals(),
)
print(f"Time taken with float16 dtype: {min(time_taken) / 3:.10f}s")
这是 KerasHub 实现与原始 PyTorch 实现的比较!
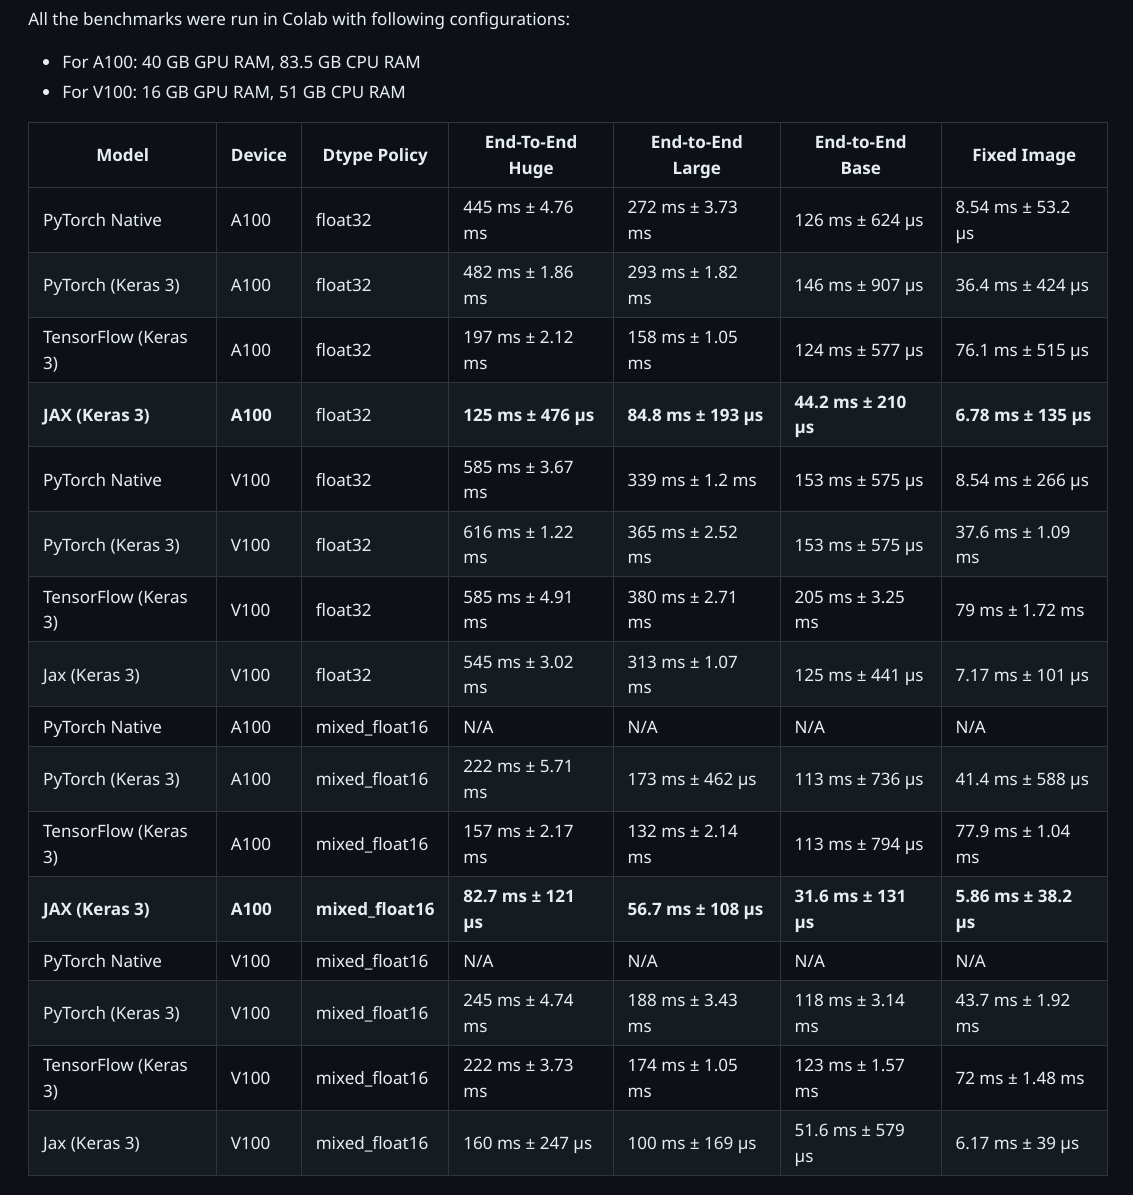
用于生成基准测试的脚本在此处。
结论
KerasHub 的 SegmentAnythingModel 支持多种应用程序,并且借助 Keras 3,可以在 TensorFlow、JAX 和 PyTorch 上运行该模型!借助 JAX 和 TensorFlow 中的 XLA,该模型比原始实现运行速度快几倍。此外,使用 Keras 的混合精度支持只需一行代码即可优化内存使用和计算时间!
有关更高级的用法,请查看自动掩码生成器演示。