DreamBooth
作者: Sayak Paul, Chansung Park
创建日期 2023/02/01
最后修改日期 2023/02/05
描述: 实现 DreamBooth。

简介
在此示例中,我们实现了 DreamBooth,一种微调技术,可以使用 3-5 张图像就能教会文本条件扩散模型新的视觉概念。DreamBooth 由 Ruiz 等人在 DreamBooth: Fine Tuning Text-to-Image Diffusion Models for Subject-Driven Generation 中提出。
DreamBooth 在某种意义上与 传统微调文本条件扩散模型的方式相似,但有几个需要注意的地方。本示例假设您已具备扩散模型的基本知识以及如何微调它们。以下是一些可能有助于您快速熟悉的内容的参考示例:
首先,我们安装最新版本的 KerasCV 和 TensorFlow。
!pip install -q -U keras_cv==0.6.0
!pip install -q -U tensorflow
如果您正在运行代码,请确保您使用的是至少拥有 24 GB VRAM 的 GPU。
初始导入
import math

import keras_cv
import matplotlib.pyplot as plt
import numpy as np
import tensorflow as tf
from imutils import paths
from tensorflow import keras
DreamBooth 的用途
... 非常通用。通过教会 Stable Diffusion 关于您喜爱的视觉概念,您可以
-
以有趣的方式重新构建对象

-
生成底层视觉概念的艺术化渲染

以及许多其他应用。我们欢迎您参考原 DreamBooth 论文。
下载实例和类别图像
DreamBooth 使用一种称为“先验保持”的技术来有意义地指导训练过程,从而使微调后的模型能够保留您引入的视觉概念的一些先验语义。有关“先验保持”的更多信息,请参阅 本文档。
在这里,我们需要引入几个 DreamBooth 特有的关键术语:
- 唯一类别 (Unique class):例如“狗”、“人”等。在本例中,我们使用“狗”。
- 唯一标识符 (Unique identifier):在形成“实例提示”时,添加到唯一类别之前的唯一标识符。在本例中,我们使用“sks”作为此唯一标识符。
- 实例提示 (Instance prompt):表示最能描述“实例图像”的提示。一个示例提示可能是 - “f"a photo of {unique_id} {unique_class}"”。因此,对于我们的示例,这变成 - “a photo of sks dog”。
- 类别提示 (Class prompt):表示没有唯一标识符的提示。此提示用于为先验保持生成“类别图像”。对于我们的示例,此提示是 - “a photo of dog”。
- 实例图像 (Instance images):表示代表您要教授的视觉概念的图像,即“实例提示”。此数量通常只有 3-5 张。我们通常自己收集这些图像。
- 类别图像 (Class images):表示使用“类别提示”生成的图像,用于 DreamBooth 训练中的先验保持。我们在微调预训练模型之前利用它来生成这些类别图像。通常,200-300 张类别图像就足够了。
在代码中,此生成过程看起来非常简单:
from tqdm import tqdm
import numpy as np
import hashlib
import keras_cv
import PIL
import os

class_images_dir = "class-images"
os.makedirs(class_images_dir, exist_ok=True)

model = keras_cv.models.StableDiffusion(img_width=512, img_height=512, jit_compile=True)

class_prompt = "a photo of dog"
num_imgs_to_generate = 200
for i in tqdm(range(num_imgs_to_generate)):
    images = model.text_to_image(
        class_prompt,
        batch_size=3,
    )
    idx = np.random.choice(len(images))
    selected_image = PIL.Image.fromarray(images[idx])
    hash_image = hashlib.sha1(selected_image.tobytes()).hexdigest()
    image_filename = os.path.join(class_images_dir, f"{hash_image}.jpg")
    selected_image.save(image_filename)
为了缩短本示例的运行时间,本示例的作者已经使用 此 notebook 生成了一些类别图像。
请注意,先验保持是 DreamBooth 中一项可选技术,但它几乎总是有助于提高生成图像的质量。
instance_images_root = tf.keras.utils.get_file(
    origin="https://hugging-face.cn/datasets/sayakpaul/sample-datasets/resolve/main/instance-images.tar.gz",
    untar=True,
)
class_images_root = tf.keras.utils.get_file(
    origin="https://hugging-face.cn/datasets/sayakpaul/sample-datasets/resolve/main/class-images.tar.gz",
    untar=True,
)
可视化图像
首先,我们加载图像路径。
instance_image_paths = list(paths.list_images(instance_images_root))
class_image_paths = list(paths.list_images(class_images_root))
然后我们从路径加载图像。
def load_images(image_paths):
    images = [np.array(keras.utils.load_img(path)) for path in image_paths]
    return images
然后我们使用一个实用函数来绘制加载的图像。
def plot_images(images, title=None):
    plt.figure(figsize=(20, 20))
    for i in range(len(images)):
        ax = plt.subplot(1, len(images), i + 1)
        if title is not None:
            plt.title(title)
        plt.imshow(images[i])
        plt.axis("off")
实例图像:
plot_images(load_images(instance_image_paths[:5]))

类别图像:
plot_images(load_images(class_image_paths[:5]))

准备数据集
数据集准备包括两个阶段:(1):准备字幕,(2) 处理图像。
准备字幕
# Since we're using prior preservation, we need to match the number
# of instance images we're using. We just repeat the instance image paths
# to do so.
new_instance_image_paths = []
for index in range(len(class_image_paths)):
    instance_image = instance_image_paths[index % len(instance_image_paths)]
    new_instance_image_paths.append(instance_image)

# We just repeat the prompts / captions per images.
unique_id = "sks"
class_label = "dog"

instance_prompt = f"a photo of {unique_id} {class_label}"
instance_prompts = [instance_prompt] * len(new_instance_image_paths)

class_prompt = f"a photo of {class_label}"
class_prompts = [class_prompt] * len(class_image_paths)
接下来,我们嵌入提示以节省一些计算资源。
import itertools

# The padding token and maximum prompt length are specific to the text encoder.
# If you're using a different text encoder be sure to change them accordingly.
padding_token = 49407
max_prompt_length = 77

# Load the tokenizer.
tokenizer = keras_cv.models.stable_diffusion.SimpleTokenizer()

# Method to tokenize and pad the tokens.
def process_text(caption):
    tokens = tokenizer.encode(caption)
    tokens = tokens + [padding_token] * (max_prompt_length - len(tokens))
    return np.array(tokens)


# Collate the tokenized captions into an array.
tokenized_texts = np.empty(
    (len(instance_prompts) + len(class_prompts), max_prompt_length)
)

for i, caption in enumerate(itertools.chain(instance_prompts, class_prompts)):
    tokenized_texts[i] = process_text(caption)


# We also pre-compute the text embeddings to save some memory during training.
POS_IDS = tf.convert_to_tensor([list(range(max_prompt_length))], dtype=tf.int32)
text_encoder = keras_cv.models.stable_diffusion.TextEncoder(max_prompt_length)

gpus = tf.config.list_logical_devices("GPU")

# Ensure the computation takes place on a GPU.
# Note that it's done automatically when there's a GPU present.
# This example just attempts at showing how you can do it
# more explicitly.
with tf.device(gpus[0].name):
    embedded_text = text_encoder(
        [tf.convert_to_tensor(tokenized_texts), POS_IDS], training=False
    ).numpy()

# To ensure text_encoder doesn't occupy any GPU space.
del text_encoder
准备图像
resolution = 512
auto = tf.data.AUTOTUNE

augmenter = keras.Sequential(
    layers=[
        keras_cv.layers.CenterCrop(resolution, resolution),
        keras_cv.layers.RandomFlip(),
        keras.layers.Rescaling(scale=1.0 / 127.5, offset=-1),
    ]
)


def process_image(image_path, tokenized_text):
    image = tf.io.read_file(image_path)
    image = tf.io.decode_png(image, 3)
    image = tf.image.resize(image, (resolution, resolution))
    return image, tokenized_text


def apply_augmentation(image_batch, embedded_tokens):
    return augmenter(image_batch), embedded_tokens


def prepare_dict(instance_only=True):
    def fn(image_batch, embedded_tokens):
        if instance_only:
            batch_dict = {
                "instance_images": image_batch,
                "instance_embedded_texts": embedded_tokens,
            }
            return batch_dict
        else:
            batch_dict = {
                "class_images": image_batch,
                "class_embedded_texts": embedded_tokens,
            }
            return batch_dict

    return fn


def assemble_dataset(image_paths, embedded_texts, instance_only=True, batch_size=1):
    dataset = tf.data.Dataset.from_tensor_slices((image_paths, embedded_texts))
    dataset = dataset.map(process_image, num_parallel_calls=auto)
    dataset = dataset.shuffle(5, reshuffle_each_iteration=True)
    dataset = dataset.batch(batch_size)
    dataset = dataset.map(apply_augmentation, num_parallel_calls=auto)

    prepare_dict_fn = prepare_dict(instance_only=instance_only)
    dataset = dataset.map(prepare_dict_fn, num_parallel_calls=auto)
    return dataset
组装数据集
instance_dataset = assemble_dataset(
    new_instance_image_paths,
    embedded_text[: len(new_instance_image_paths)],
)
class_dataset = assemble_dataset(
    class_image_paths,
    embedded_text[len(new_instance_image_paths) :],
    instance_only=False,
)
train_dataset = tf.data.Dataset.zip((instance_dataset, class_dataset))
检查形状
现在数据集已准备好,让我们快速检查一下里面有什么。
sample_batch = next(iter(train_dataset))
print(sample_batch[0].keys(), sample_batch[1].keys())

for k in sample_batch[0]:
    print(k, sample_batch[0][k].shape)

for k in sample_batch[1]:
    print(k, sample_batch[1][k].shape)
dict_keys(['instance_images', 'instance_embedded_texts']) dict_keys(['class_images', 'class_embedded_texts'])
instance_images (1, 512, 512, 3)
instance_embedded_texts (1, 77, 768)
class_images (1, 512, 512, 3)
class_embedded_texts (1, 77, 768)
在训练期间,我们使用这些键来收集图像和文本嵌入并相应地连接它们。
DreamBooth 训练循环
我们的 DreamBooth 训练循环很大程度上受到了 Hugging Face Diffusers 团队提供的 此脚本 的启发。但是,有一个重要的区别需要注意。在本例中,我们只微调 UNet(负责预测噪声的模型),而不微调文本编码器。如果您正在寻找也对文本编码器进行额外微调的实现,请参考 此存储库。
import tensorflow.experimental.numpy as tnp


class DreamBoothTrainer(tf.keras.Model):
    # Reference:
    # https://github.com/huggingface/diffusers/blob/main/examples/dreambooth/train_dreambooth.py

    def __init__(
        self,
        diffusion_model,
        vae,
        noise_scheduler,
        use_mixed_precision=False,
        prior_loss_weight=1.0,
        max_grad_norm=1.0,
        **kwargs,
    ):
        super().__init__(**kwargs)

        self.diffusion_model = diffusion_model
        self.vae = vae
        self.noise_scheduler = noise_scheduler
        self.prior_loss_weight = prior_loss_weight
        self.max_grad_norm = max_grad_norm

        self.use_mixed_precision = use_mixed_precision
        self.vae.trainable = False

    def train_step(self, inputs):
        instance_batch = inputs[0]
        class_batch = inputs[1]

        instance_images = instance_batch["instance_images"]
        instance_embedded_text = instance_batch["instance_embedded_texts"]
        class_images = class_batch["class_images"]
        class_embedded_text = class_batch["class_embedded_texts"]

        images = tf.concat([instance_images, class_images], 0)
        embedded_texts = tf.concat([instance_embedded_text, class_embedded_text], 0)
        batch_size = tf.shape(images)[0]

        with tf.GradientTape() as tape:
            # Project image into the latent space and sample from it.
            latents = self.sample_from_encoder_outputs(self.vae(images, training=False))
            # Know more about the magic number here:
            # https://keras.org.cn/examples/generative/fine_tune_via_textual_inversion/
            latents = latents * 0.18215

            # Sample noise that we'll add to the latents.
            noise = tf.random.normal(tf.shape(latents))

            # Sample a random timestep for each image.
            timesteps = tnp.random.randint(
                0, self.noise_scheduler.train_timesteps, (batch_size,)
            )

            # Add noise to the latents according to the noise magnitude at each timestep
            # (this is the forward diffusion process).
            noisy_latents = self.noise_scheduler.add_noise(
                tf.cast(latents, noise.dtype), noise, timesteps
            )

            # Get the target for loss depending on the prediction type
            # just the sampled noise for now.
            target = noise  # noise_schedule.predict_epsilon == True

            # Predict the noise residual and compute loss.
            timestep_embedding = tf.map_fn(
                lambda t: self.get_timestep_embedding(t), timesteps, dtype=tf.float32
            )
            model_pred = self.diffusion_model(
                [noisy_latents, timestep_embedding, embedded_texts], training=True
            )
            loss = self.compute_loss(target, model_pred)
            if self.use_mixed_precision:
                loss = self.optimizer.get_scaled_loss(loss)

        # Update parameters of the diffusion model.
        trainable_vars = self.diffusion_model.trainable_variables
        gradients = tape.gradient(loss, trainable_vars)
        if self.use_mixed_precision:
            gradients = self.optimizer.get_unscaled_gradients(gradients)
        gradients = [tf.clip_by_norm(g, self.max_grad_norm) for g in gradients]
        self.optimizer.apply_gradients(zip(gradients, trainable_vars))

        return {m.name: m.result() for m in self.metrics}

    def get_timestep_embedding(self, timestep, dim=320, max_period=10000):
        half = dim // 2
        log_max_period = tf.math.log(tf.cast(max_period, tf.float32))
        freqs = tf.math.exp(
            -log_max_period * tf.range(0, half, dtype=tf.float32) / half
        )
        args = tf.convert_to_tensor([timestep], dtype=tf.float32) * freqs
        embedding = tf.concat([tf.math.cos(args), tf.math.sin(args)], 0)
        return embedding

    def sample_from_encoder_outputs(self, outputs):
        mean, logvar = tf.split(outputs, 2, axis=-1)
        logvar = tf.clip_by_value(logvar, -30.0, 20.0)
        std = tf.exp(0.5 * logvar)
        sample = tf.random.normal(tf.shape(mean), dtype=mean.dtype)
        return mean + std * sample

    def compute_loss(self, target, model_pred):
        # Chunk the noise and model_pred into two parts and compute the loss
        # on each part separately.
        # Since the first half of the inputs has instance samples and the second half
        # has class samples, we do the chunking accordingly.
        model_pred, model_pred_prior = tf.split(
            model_pred, num_or_size_splits=2, axis=0
        )
        target, target_prior = tf.split(target, num_or_size_splits=2, axis=0)

        # Compute instance loss.
        loss = self.compiled_loss(target, model_pred)

        # Compute prior loss.
        prior_loss = self.compiled_loss(target_prior, model_pred_prior)

        # Add the prior loss to the instance loss.
        loss = loss + self.prior_loss_weight * prior_loss
        return loss

    def save_weights(self, filepath, overwrite=True, save_format=None, options=None):
        # Overriding this method will allow us to use the `ModelCheckpoint`
        # callback directly with this trainer class. In this case, it will
        # only checkpoint the `diffusion_model` since that's what we're training
        # during fine-tuning.
        self.diffusion_model.save_weights(
            filepath=filepath,
            overwrite=overwrite,
            save_format=save_format,
            options=options,
        )

    def load_weights(self, filepath, by_name=False, skip_mismatch=False, options=None):
        # Similarly override `load_weights()` so that we can directly call it on
        # the trainer class object.
        self.diffusion_model.load_weights(
            filepath=filepath,
            by_name=by_name,
            skip_mismatch=skip_mismatch,
            options=options,
        )
Trainer 初始化
# Comment it if you are not using a GPU having tensor cores.
tf.keras.mixed_precision.set_global_policy("mixed_float16")

use_mp = True  # Set it to False if you're not using a GPU with tensor cores.

image_encoder = keras_cv.models.stable_diffusion.ImageEncoder()
dreambooth_trainer = DreamBoothTrainer(
    diffusion_model=keras_cv.models.stable_diffusion.DiffusionModel(
        resolution, resolution, max_prompt_length
    ),
    # Remove the top layer from the encoder, which cuts off the variance and only
    # returns the mean.
    vae=tf.keras.Model(
        image_encoder.input,
        image_encoder.layers[-2].output,
    ),
    noise_scheduler=keras_cv.models.stable_diffusion.NoiseScheduler(),
    use_mixed_precision=use_mp,
)

# These hyperparameters come from this tutorial by Hugging Face:
# https://github.com/huggingface/diffusers/tree/main/examples/dreambooth
learning_rate = 5e-6
beta_1, beta_2 = 0.9, 0.999
weight_decay = (1e-2,)
epsilon = 1e-08

optimizer = tf.keras.optimizers.experimental.AdamW(
    learning_rate=learning_rate,
    weight_decay=weight_decay,
    beta_1=beta_1,
    beta_2=beta_2,
    epsilon=epsilon,
)
dreambooth_trainer.compile(optimizer=optimizer, loss="mse")
训练!
我们首先计算需要训练的 epoch 数。
num_update_steps_per_epoch = train_dataset.cardinality()
max_train_steps = 800
epochs = math.ceil(max_train_steps / num_update_steps_per_epoch)
print(f"Training for {epochs} epochs.")
Training for 4 epochs.
然后我们开始训练!
ckpt_path = "dreambooth-unet.h5"
ckpt_callback = tf.keras.callbacks.ModelCheckpoint(
    ckpt_path,
    save_weights_only=True,
    monitor="loss",
    mode="min",
)
dreambooth_trainer.fit(train_dataset, epochs=epochs, callbacks=[ckpt_callback])
Epoch 1/4
200/200 [==============================] - 301s 462ms/step - loss: 0.1203
Epoch 2/4
200/200 [==============================] - 94s 469ms/step - loss: 0.1139
Epoch 3/4
200/200 [==============================] - 94s 469ms/step - loss: 0.1016
Epoch 4/4
200/200 [==============================] - 94s 469ms/step - loss: 0.1231

<keras.callbacks.History at 0x7f19726600a0>
实验和推理
我们使用此示例的一个略微修改的版本进行了一系列实验。我们的实验基于 此存储库,并受到 Hugging Face 的 这篇博文 的启发。
首先,让我们看看如何使用微调后的检查点进行推理。
# Initialize a new Stable Diffusion model.
dreambooth_model = keras_cv.models.StableDiffusion(
img_width=resolution, img_height=resolution, jit_compile=True
)
dreambooth_model.diffusion_model.load_weights(ckpt_path)
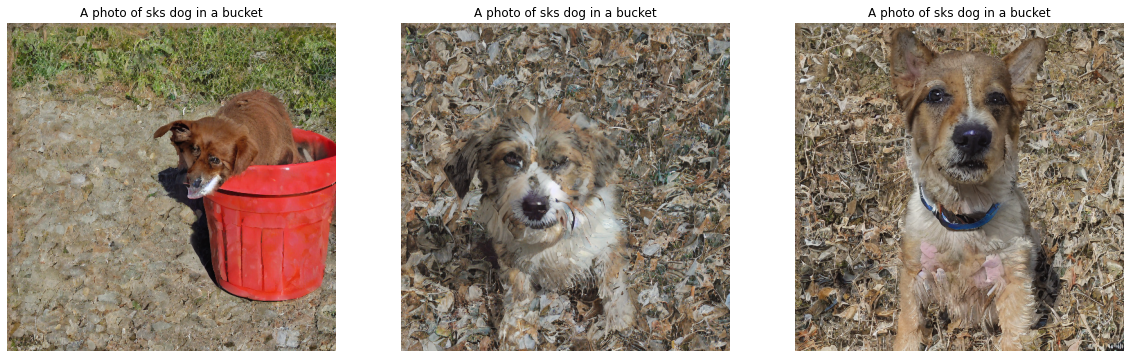
# Note how the unique identifier and the class have been used in the prompt.
prompt = f"A photo of {unique_id} {class_label} in a bucket"
num_imgs_to_gen = 3
images_dreamboothed = dreambooth_model.text_to_image(prompt, batch_size=num_imgs_to_gen)
plot_images(images_dreamboothed, prompt)
By using this model checkpoint, you acknowledge that its usage is subject to the terms of the CreativeML Open RAIL-M license at https://raw.githubusercontent.com/CompVis/stable-diffusion/main/LICENSE
50/50 [==============================] - 42s 160ms/step
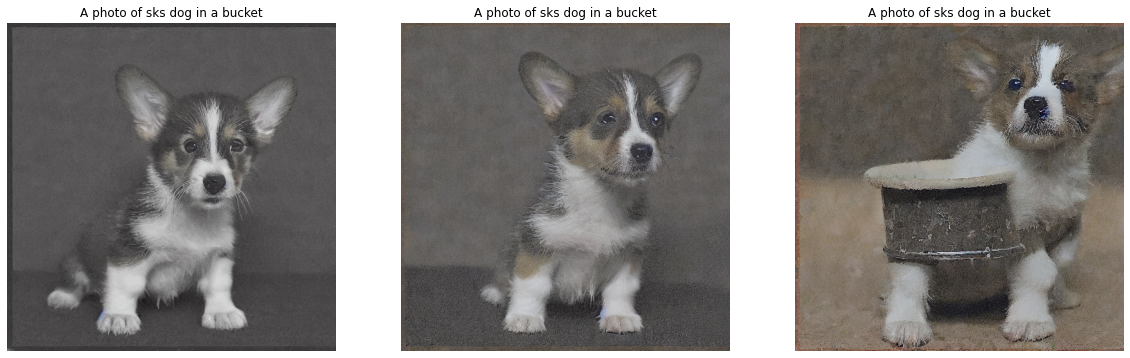
现在,让我们加载我们在另一个实验中进行的检查点,在该实验中,我们还同时微调了文本编码器和 UNet。
unet_weights = tf.keras.utils.get_file(
    origin="https://hugging-face.cn/chansung/dreambooth-dog/resolve/main/lr%409e-06-max_train_steps%40200-train_text_encoder%40True-unet.h5"
)
text_encoder_weights = tf.keras.utils.get_file(
    origin="https://hugging-face.cn/chansung/dreambooth-dog/resolve/main/lr%409e-06-max_train_steps%40200-train_text_encoder%40True-text_encoder.h5"
)

dreambooth_model.diffusion_model.load_weights(unet_weights)
dreambooth_model.text_encoder.load_weights(text_encoder_weights)

images_dreamboothed = dreambooth_model.text_to_image(prompt, batch_size=num_imgs_to_gen)
plot_images(images_dreamboothed, prompt)
Downloading data from https://hugging-face.cn/chansung/dreambooth-dog/resolve/main/lr%409e-06-max_train_steps%40200-train_text_encoder%40True-unet.h5
3439088208/3439088208 [==============================] - 67s 0us/step
Downloading data from https://hugging-face.cn/chansung/dreambooth-dog/resolve/main/lr%409e-06-max_train_steps%40200-train_text_encoder%40True-text_encoder.h5
492466760/492466760 [==============================] - 9s 0us/step
50/50 [==============================] - 8s 159ms/step
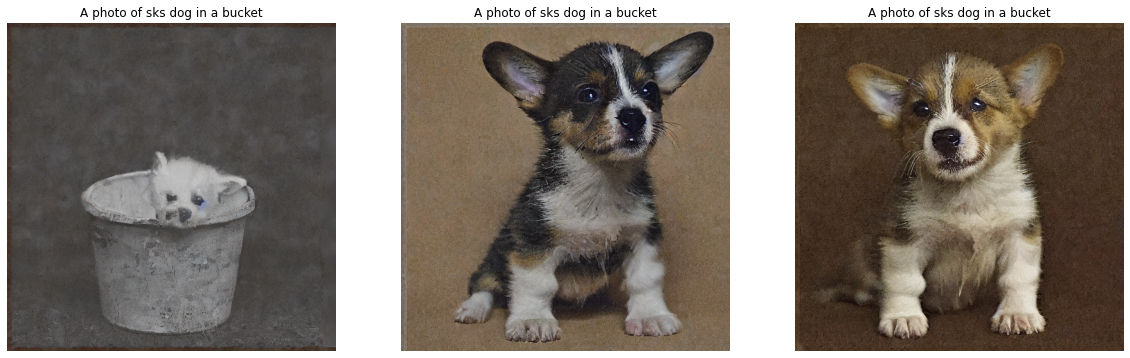
text_to_image() 中生成图像的默认步数 为 50。让我们将其增加到 100。
images_dreamboothed = dreambooth_model.text_to_image(
    prompt, batch_size=num_imgs_to_gen, num_steps=100
)
plot_images(images_dreamboothed, prompt)
100/100 [==============================] - 16s 159ms/step
随意尝试不同的提示(别忘了添加唯一标识符和类别标签!),看看结果如何变化。我们欢迎您查看我们的代码库和更多实验结果 在此。您也可以阅读 这篇博文 以获取更多想法。
致谢
- 感谢 Hugging Face 提供的 DreamBooth 示例脚本,它极大地帮助我们快速完成了初始实现。
- 让 DreamBooth 在人脸上工作可能会有挑战。我们在此 整理了一些通用建议。感谢 Abhishek Thakur 在这方面的帮助。